Conch Hoop Size Guide: 8mm, 9mm, 10mm & 12mm
- Conch hoops are the largest ear piercing hoops — typically 10–12mm, significantly bigger than helix or tragus rings
- The ring must travel from the conch (inner ear) all the way around the outer rim of the ear — this is why the diameter is so large
- 10mm is the most popular conch hoop size — fits the majority of ears with a snug hug around the helix rim
- 12mm is needed for larger ears or piercings positioned further from the ear edge
- Inner conch and outer conch piercings require different hoop diameters due to their position
- Standard conch gauge is 16G (1.2mm) — thicker than nostril or lobe jewellery
What makes conch hoops different
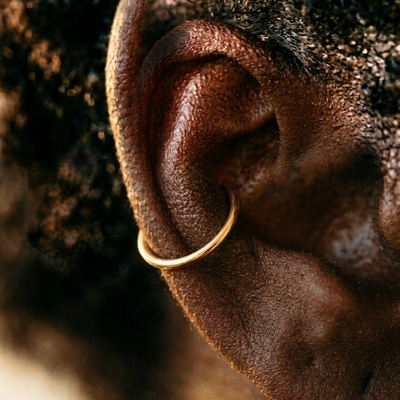
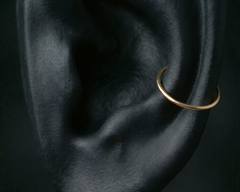
A conch hoop is unlike any other ear hoop because of the distance it needs to travel. The piercing sits in the flat cartilage bowl of the inner ear (the concha), but the ring exits through the piercing and wraps all the way around the outer rim (the helix edge) of the ear. This means the ring must be large enough to span from the inner ear to the outer edge and back.
To visualise: a helix hoop wraps around the thin rim of the ear (6–8mm). A tragus hoop wraps around a small cartilage tab (5–7mm). A conch hoop wraps from the centre of the ear to its outer edge and around (10–12mm). The conch requires the largest hoop of any standard ear piercing.
This is also why conch hoops make such a dramatic visual statement. A gold ring that wraps the entire width of the ear catches light, draws attention, and transforms the look of a curated ear stack.
8mm vs 9mm vs 10mm vs 12mm
| Diameter | Fit | Look | Best for |
|---|---|---|---|
| 8mm | Very snug | Tight against helix rim, minimal gap | Very small ears, piercing extremely close to rim |
| 9mm | Snug | Close hug, neat and compact | Smaller ears, inner conch close to the rim |
| 10mm MOST POPULAR | Comfortable | Classic conch hoop look, clean wrap | Standard ears, most conch placements |
| 12mm | Relaxed | Wider arc, more visible ring around the ear | Larger ears, deeper conch placements, statement look |
8mm — rarely the right choice
8mm is small for a conch hoop. It only works if you have a notably small ear and the piercing is positioned very close to the outer helix rim. For most people, an 8mm ring will be too tight — it will press against the helix, pinch the cartilage, and may not even close properly around the ear edge. Do not order 8mm unless you have measured and confirmed the distance from your piercing to the ear rim is under 7mm.
9mm — the compact option
9mm works for people with smaller ears where the conch sits relatively close to the helix rim. It creates a neat, compact ring that hugs the ear edge without much gap. This size is also worth considering if 10mm feels slightly loose and you want a tighter, more streamlined look.
10mm — the standard
10mm is the most commonly purchased conch hoop size. It fits the majority of ear anatomies with a standard conch piercing placement, creating the classic look: a complete gold ring wrapping smoothly around the helix rim with a small, intentional gap. This is the size that makes conch hoops such a recognisable and coveted ear piercing accessory.
If you are ordering your first conch hoop and do not know your exact measurement, 10mm is the safest starting point. It accommodates slight variations in ear size and piercing position better than any other diameter.
12mm — for larger ears or deeper placements
12mm is needed when the distance from the conch piercing to the ear rim is greater than average. This happens with larger ears generally, or when the piercing is positioned deeper in the concha (further from the outer edge). A 12mm hoop creates a wider arc and a bolder visual statement. It is also the go-to size for outer conch piercings, where the piercing sits higher and further from the rim than a standard inner conch.
Inner conch vs outer conch: sizing differences
The conch is a large area of the ear, and where within it your piercing sits dramatically affects which hoop sizes fit.
Inner conch (lower, central)
The most common conch placement. The piercing sits in the lower, central portion of the concha — the cupped area near the ear canal. From here, the hoop wraps around the lower portion of the helix rim, which is typically the shortest distance from conch to edge. Most people with an inner conch piercing need 10mm or 9mm.
Outer conch (upper, near antihelix)
Less common. The piercing sits in the upper portion of the concha, closer to the antihelix ridge. From this position, the hoop must travel a longer distance to reach the helix rim, because the ear is wider at this point. Most people with an outer conch piercing need 12mm or occasionally 10mm.
| Conch position | Typical hoop size | Why |
|---|---|---|
| Inner conch (lower) | 9–10mm | Shorter distance to helix rim at the lower ear |
| Outer conch (upper) | 10–12mm | Wider ear at this height, longer distance to rim |
If you are unsure whether your piercing is inner or outer conch, see our inner vs outer conch guide for a visual reference.
How to measure
Conch gauge guide
| Gauge | Thickness | Notes |
|---|---|---|
| 18G (1.0mm) | Thinner option | Daintier look. Some piercers use 18G for conch. Works well in gold for a fine-jewellery aesthetic. |
| 16G (1.2mm) STANDARD | Standard | Most common conch gauge. The majority of conch jewellery is manufactured in 16G. |
| 14G (1.6mm) | Thicker option | Less common for conch. Creates a bolder ring, uses more gold. Only if your piercing was done at 14G. |
Because conch hoops are larger than most ear hoops, the gauge is more visible. A 10mm ring in 18G looks noticeably more delicate than the same diameter in 16G. In 14K gold, the 18G option creates an elegant, fine-jewellery feel, while 16G feels more substantial and structured.
Conch hoops and headphones
Headphone compatibility is a genuine concern with conch hoops because the ring wraps around the outer ear — exactly where over-ear headphone padding rests.
Over-ear headphones: These press the ring against the helix rim. With a properly sized, snug hoop, this is usually tolerable for short sessions. For extended wear, the pressure can become uncomfortable. Some people find that adjusting the headphone angle or loosening the headband helps. Others switch to a flat-back stud when they know they will be wearing over-ear headphones for hours.
Earbuds (AirPods, etc.): No conflict. Earbuds sit in the ear canal, not on the outer ear. A conch hoop does not interfere with earbuds at all. This is the opposite of the tragus situation — conch hoops and earbuds coexist perfectly.
During healing: Avoid over-ear headphones on the pierced ear entirely. Earbuds are fine as long as you do not bump the stud when inserting them. Once healed and wearing a hoop, earbuds remain the most practical headphone option for conch piercing wearers.
When to switch from stud to hoop
Conch piercings are among the slowest ear piercings to heal. The flat cartilage has limited blood supply and is exposed to constant sleeping pressure. The healing timeline for a conch is typically 6–12 months.
Minimum for hoop switch: 6 months. Only if the piercing shows zero tenderness, zero discharge, and zero crusty buildup. Your piercer should confirm readiness.
Ideal for hoop switch: 9 months. The channel is more mature and stable. The risk of an irritation bump from the hoop movement is significantly lower at this point.
Always have your piercer perform the first hoop insertion. They can confirm readiness, verify the hoop size is correct for your anatomy, and demonstrate the insertion technique. See our conch healing guide for the full timeline.
Common mistakes
Using a helix hoop size for the conch. Helix hoops are typically 6–8mm. Conch hoops need 10–12mm. A 6mm ring physically cannot wrap from the conch to the ear rim — it is nowhere near large enough. Always buy conch-specific sizes.
Not accounting for ear shape. Ears are not flat. The curve of the antihelix, the fold of the helix rim, and the depth of the concha all affect how a hoop sits. Two people with the same straight-line measurement from conch to rim may need different hoop diameters because their ear curves differently. Measuring with a flexible strip (as described above) accounts for this curve.
Switching too early. The conch takes 6–12 months to heal. Putting a hoop in at month 3 or 4 — when the piercing looks healed on the surface — almost always results in an irritation bump. The internal channel is not ready for the constant rotation of a hoop. Wait for your piercer’s confirmation.
Sleeping on the hoop. Sleeping pressure is the number one cause of conch healing complications, and it does not stop being relevant after healing. Sleeping on a conch hoop presses the ring into the helix rim and against the cartilage. Use a travel pillow with a hole, or train yourself to sleep on the opposite side.