New 14ct solid gold hoop


Inner vs Outer Conch Piercing: Which Should You Get?
- Inner conch: pierced in the centre bowl of the ear, best with studs, subtle and elegant
- Outer conch: pierced in the flat area near the rim, famous for the dramatic hoop-wrap look
- Both have similar pain (5-6/10) and healing time (6-12 months)
- Inner conch suits stud lovers; outer conch suits hoop lovers
- You can get both on the same ear for a layered look, but heal one first
Inner vs outer explained
The conch is the large flat area of cartilage in the centre of your ear. It is divided into two zones, each creating a completely different aesthetic when pierced:
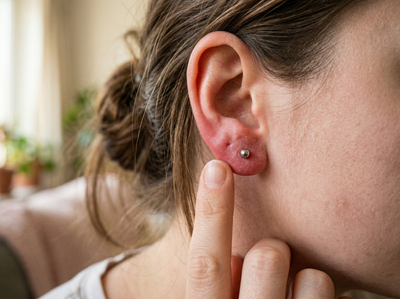
Inner conch: the deepest part of the ear bowl, closer to the ear canal. Typically worn with a flat-back stud or small hoop. Creates a focal point in the centre of the ear — subtle, elegant, and relatively hidden.
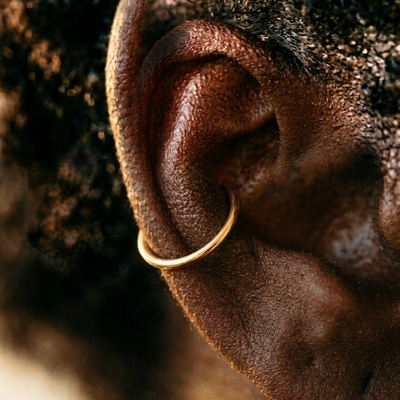
Outer conch: the flatter area closer to the antihelix and ear rim. Famous for the dramatic hoop look where the ring wraps around the outer edge of the ear. This is the piercing that creates the bold, eye-catching conch hoop aesthetic.
Side-by-side comparison
| Inner Conch | Outer Conch | |
|---|---|---|
| Location | Centre bowl, near ear canal | Flat area near antihelix/rim |
| Pain | 5-6/10 | 5-6/10 |
| Healing | 6-12 months | 6-12 months |
| Best jewellery | Flat-back stud, small hoop (8-9mm) | Large hoop (10-12mm) for wrap effect |
| Aesthetic | Subtle, centred, elegant | Bold, dramatic, editorial |
| Visibility | Moderate — visible but understated | High — the hoop wraps the ear edge |
| Headphones | Over-ear may press on stud | Over-ear may press on hoop |
Inner conch in detail
The inner conch is the more subtle of the two options. A gemstone stud or small gold disc in the centre of the ear creates a neat focal point. It pairs beautifully with helix hoops, creating a rim-and-centre composition.
Best jewellery: flat-back labret stud (during healing and as a permanent option) or a small seamless hoop (8-9mm once healed). The inner conch can accommodate a hoop, but the ring sits closer to the ear canal rather than wrapping the edge.
Ideal for: people who prefer studs, want something more discreet, or plan to combine the conch with other piercings where the conch serves as a subtle anchor point.
Outer conch in detail
The outer conch is the statement option. Once healed, a large hoop (10-12mm) passes through the flat cartilage and wraps around the outer edge of the ear. This creates one of the most visually striking looks in ear piercing — a bold ring that hugs the ear's contour.
Best jewellery: flat-back stud during healing (always), then a seamless hoop once healed. The hoop size needs to be large enough to wrap from the piercing hole to the ear edge — typically 10-12mm depending on your anatomy.
Ideal for: people who want the iconic conch hoop wrap, love bold jewellery, and are willing to wait 6-12 months to switch from the healing stud to the final hoop.
Jewellery differences
| Type | Stud Size | Hoop Size | Notes |
|---|---|---|---|
| Inner conch | 4-5mm top | 8-9mm | Hoop sits in bowl, does not wrap edge |
| Outer conch | 4-5mm top | 10-12mm Popular | Hoop wraps ear edge for dramatic effect |

Which should you choose?
Get an inner conch if: you prefer studs and gemstones, want a more subtle look, like the idea of a centred focal point, or plan to build a curated ear where the conch is one element among several.
Get an outer conch if: you want the iconic hoop wrap, love bold jewellery, are patient enough for 6-12 months in a stud before switching, and want a piercing that makes a clear visual statement.
Get both: an inner conch stud combined with an outer conch hoop creates a layered, editorial look. Heal one completely before getting the other.