Cartilage Piercing Size Guide: Hoops, Studs & Gauge Chart
- Every cartilage piercing has its own standard gauge and diameter range — sizes do not transfer between piercings
- Most ear cartilage piercings are 16G (1.2mm) — thicker than lobes (20G) because cartilage needs structural support
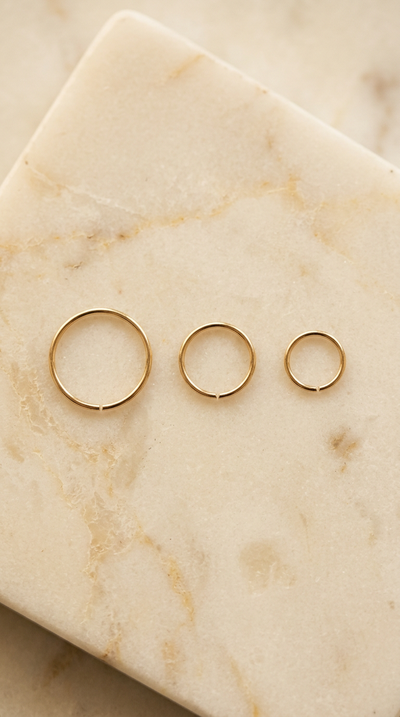
- Helix hoops are typically 6–8mm. Rook hoops are 5–7mm. Tragus and daith are 6–8mm. Conch hoops are 10–14mm.
- Always heal on a flat-back stud or curved barbell — never a hoop. Switch to a hoop only after full healing.
- Measure each piercing independently — even on the same ear, each position has different anatomy
- 14K solid gold and implant-grade titanium are the only materials recommended for cartilage piercings
The master size chart
This is the single reference table you need. It covers every standard ear cartilage piercing with the correct gauge, typical hoop diameter range, healing jewellery type and healing time. Bookmark this page.
| Piercing | Standard gauge | Hoop diameter | Healing jewellery | Healing time |
|---|---|---|---|---|
| Helix (upper) | 16G or 18G | 6–8mm 6mm COMMON | Flat-back labret stud | 6–9 months |
| Helix (mid / lower) | 16G or 18G | 7–8mm | Flat-back labret stud | 6–9 months |
| Forward helix | 16G or 18G | 5–6mm | Flat-back labret stud | 6–12 months |
| Tragus | 16G | 6–8mm | Flat-back labret stud | 6–12 months |
| Anti-tragus | 16G | 6–8mm | Curved barbell or flat-back | 6–12 months |
| Rook | 16G ALWAYS 16G | 5–7mm | Curved barbell | 9–12 months |
| Daith | 16G | 6–8mm | Curved barbell or CBR | 9–12 months |
| Conch (inner) | 16G | 10–14mm (wraps outer rim) | Flat-back labret stud | 6–12 months |
| Industrial | 14G | N/A (straight barbell, 32–38mm) | Industrial barbell | 9–18 months |
| Orbital | 16G | 10–14mm (connects two holes) | Two flat-back studs, ring after healing | 9–12 months |
Why every cartilage piercing needs a different size
People often assume that once they know their helix size, they know their size for every cartilage piercing. This is wrong, and here is why.
Cartilage thickness varies by location. The helix rim is 1–2mm of thin cartilage. The rook fold is 4–6mm of thick cartilage. The tragus is a small cartilage nub of varying thickness. A hoop that wraps around thin cartilage needs a smaller diameter than one wrapping around thick cartilage.
Piercing angle changes the geometry. A helix piercing goes straight through a flat rim. A rook piercing goes through a vertical fold at an angle. A conch hoop wraps around the entire outer rim from an inner hole. Each geometry requires a different ring diameter to sit correctly.
The surrounding structures constrain the ring. A rook hoop must fit between the fold and the anti-helix wall. A daith hoop must sit inside the ear canal entrance without blocking it. A conch hoop must clear the helix rim. These constraints are different for every piercing and change the maximum and minimum viable diameter.
Each piercing explained
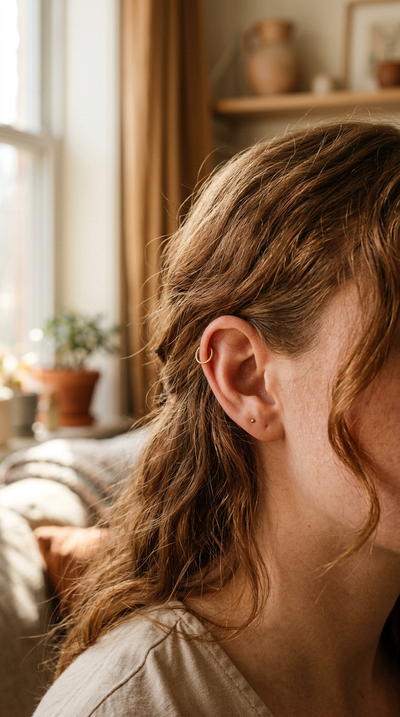
Helix
The most common cartilage piercing. Sits on the outer rim of the upper ear. Hoops wrap around the thin rim edge, creating a small ring on the ear contour. 6mm is the most popular size for upper helix. Lower helix placements need 7–8mm because the rim thickens as it descends. Gauge is 16G or 18G depending on the piercer. Forward helix (at the front where the rim meets the face) needs smaller hoops: 5–6mm.
Tragus
The small cartilage flap in front of the ear canal. Hoops wrap around this nub from front to back. Most tragus piercings take 6–8mm hoops, with 6mm being the most common for a snug fit. Always 16G. The tragus is close to the ear canal, so a too-large ring can press against the canal opening and cause discomfort, especially with earbuds.
Rook
The vertical fold of cartilage above the tragus, inside the upper ear bowl. The rook is the deepest ear piercing and uses the smallest hoops relative to its position: 5–7mm with 6mm being the default. Always 16G — no exceptions. Must heal on a curved barbell for 9–12 months before switching to a hoop. See our full rook hoop size guide for detailed anatomy and measuring.
Daith
The fold of cartilage directly above the ear canal opening. The daith is often pierced with a heart-shaped ring or captive bead ring as the initial jewellery. Hoops range from 6–8mm, with 8mm being more common because the daith fold tends to be wider than the rook. Always 16G. Heals in 9–12 months.
Conch
The flat bowl of cartilage in the centre of the ear, between the ear canal and the outer rim. A conch can wear either a stud (sitting flat in the bowl) or a hoop (passing through the bowl and wrapping around the outer helix rim). Conch hoops are much larger than other cartilage hoops — typically 10–14mm — because the ring has to travel from the inner bowl all the way around the outer rim. Always 16G.
Industrial
Two helix piercings connected by a single straight barbell that passes through both holes. The barbell is typically 32–38mm long, depending on ear width. Industrial piercings are usually 14G (1.6mm) — one step thicker than standard cartilage — because the long barbell needs extra rigidity. Healing time is the longest of all ear piercings: 9–18 months.
The cartilage gauge standard
Cartilage piercings use thicker gauges than lobes because cartilage is rigid tissue that exerts lateral pressure on the jewellery post. A thin post in cartilage can migrate — slowly cutting through the tissue under the combined force of gravity and daily movement.
| Gauge | Millimetres | Used for |
|---|---|---|
| 14G | 1.6mm | Industrial barbell only |
| 16G CARTILAGE STANDARD | 1.2mm | Rook, tragus, daith, conch, anti-tragus, most helix |
| 18G | 1.0mm | Some helix piercings, healed cartilage downsized for dainty look |
| 20G | 0.8mm | Lobe standard. Not recommended for cartilage (migration risk). |
The rule is simple: if your piercing is in cartilage, assume 16G unless a piercer has specifically told you otherwise. If you want to go thinner for aesthetics, 18G is the absolute minimum for helix, and most piercers will not recommend going below 16G for rook, tragus, daith or conch. See our rook gauge guide for detailed information on why thinner gauges carry risk on thick cartilage.
Studs vs hoops — sizing differences
Cartilage piercings can wear either studs (flat-back labret posts) or hoops (seamless rings, clickers, CBRs). The sizing considerations are different for each:
Flat-back labret studs
Studs are defined by post length (how long the bar is) and top size (how wide the decorative front is). Post length must match your cartilage thickness — too short and the disc presses into the skin, too long and the post sticks out and catches on things. Standard cartilage post lengths are 6mm (initial, allows for swelling) and 4–5mm (downsized, fits snugly after swelling subsides). A piercer measures and downsizes at your 3–4 month appointment.
Hoops
Hoops are defined by inner diameter (how wide the circle is) and gauge (how thick the wire is). Inner diameter must match the distance from your piercing hole, around the cartilage edge, back to the hole. Too small and the hoop pinches. Too large and it hangs loose and catches. The master chart above gives the diameter range for each piercing.
Heal on a stud, switch to a hoop
This rule applies to every cartilage piercing without exception. A hoop rotates inside the healing channel with every jaw movement, head turn, sleep shift and hair snag. That rotation drags bacteria and dead skin through the immature channel and prevents it from stabilising. A stud does not rotate — it sits still and lets the tissue heal around it.
| Piercing | Heal on | Switch to hoop at |
|---|---|---|
| Helix | Flat-back labret stud | Month 6–9 |
| Forward helix | Flat-back labret stud | Month 6–12 |
| Tragus | Flat-back labret stud | Month 6–12 |
| Rook | Curved barbell | Month 9–12 |
| Daith | Curved barbell or CBR | Month 9–12 (many heal on a ring) |
| Conch | Flat-back labret stud | Month 6–12 |
| Industrial | Industrial barbell | Never — stays as barbell |
The daith exception: The daith is the one cartilage piercing sometimes pierced with a ring from day one, because its anatomy (a tight fold above the ear canal) makes stud insertion and retention difficult. If your piercer uses a ring for initial daith jewellery, this is standard practice for daith specifically — not a general cartilage rule.
How to measure any cartilage piercing
The measuring method is the same for every cartilage hoop. The anatomy changes, but the process does not:
1. Find the piercing hole. Locate both the front and back entry points of the piercing.
2. Measure from the hole to the nearest cartilage edge. This is the distance the hoop must travel to wrap around the cartilage.
3. Add 1–2mm. This gives room for the ring to sit comfortably without pinching. +1mm = snug. +2mm = comfortable with a small gap.
4. Or measure an existing hoop that fits. If you already wear a hoop that fits well, measure the inner diameter from inside edge to inside edge. This is your confirmed size for that piercing.
For hard-to-see piercings (rook, daith, forward helix), ask a friend or piercer to measure. A mirror alone is often not enough for piercings inside the ear bowl.
Cartilage vs lobe — the key differences
| Cartilage | Lobe | |
|---|---|---|
| Tissue | Rigid, avascular | Soft, vascular |
| Standard gauge | 16G (1.2mm) | 20G (0.8mm) |
| Healing time | 6–18 months | 6–8 weeks |
| Hoop timing | After full healing only | After 6–8 weeks |
| Bump risk | High — cartilage reacts to pressure | Low — soft tissue is forgiving |
| Migration risk at thin gauge | Real — wire can cut through cartilage | None — soft tissue does not exert cutting pressure |
| Sleeping restriction | 6+ months on opposite side | 2 weeks |
If you are moving from lobe piercings to your first cartilage piercing, the most important adjustment is patience. Lobes heal in weeks. Cartilage heals in months. The aftercare routine is the same (saline, do not touch), but the timeline is dramatically longer. See our lobe healing guide and rook aftercare guide for the specific timelines.