
Conch Piercing: The Complete Guide to Sizing, Healing, Hoops & Building the Perfect Ear Stack

- Conch piercings are 16G or 18G and need the largest hoop diameters of any ear piercing — typically 10–15mm — because the ring must travel from the inner ear bowl, over the helix rim, and around to the back of the ear
- Inner conch and outer conch are different piercings — inner conch is the standard choice for hoop jewellery. Outer conch may not comfortably accommodate a hoop at all due to the antihelix ridge
- Wait 9–12 months before switching from stud to hoop. Switching too early is the number-one cause of irritation bumps after conch jewellery changes. The cartilage looks healed months before the internal channel is ready
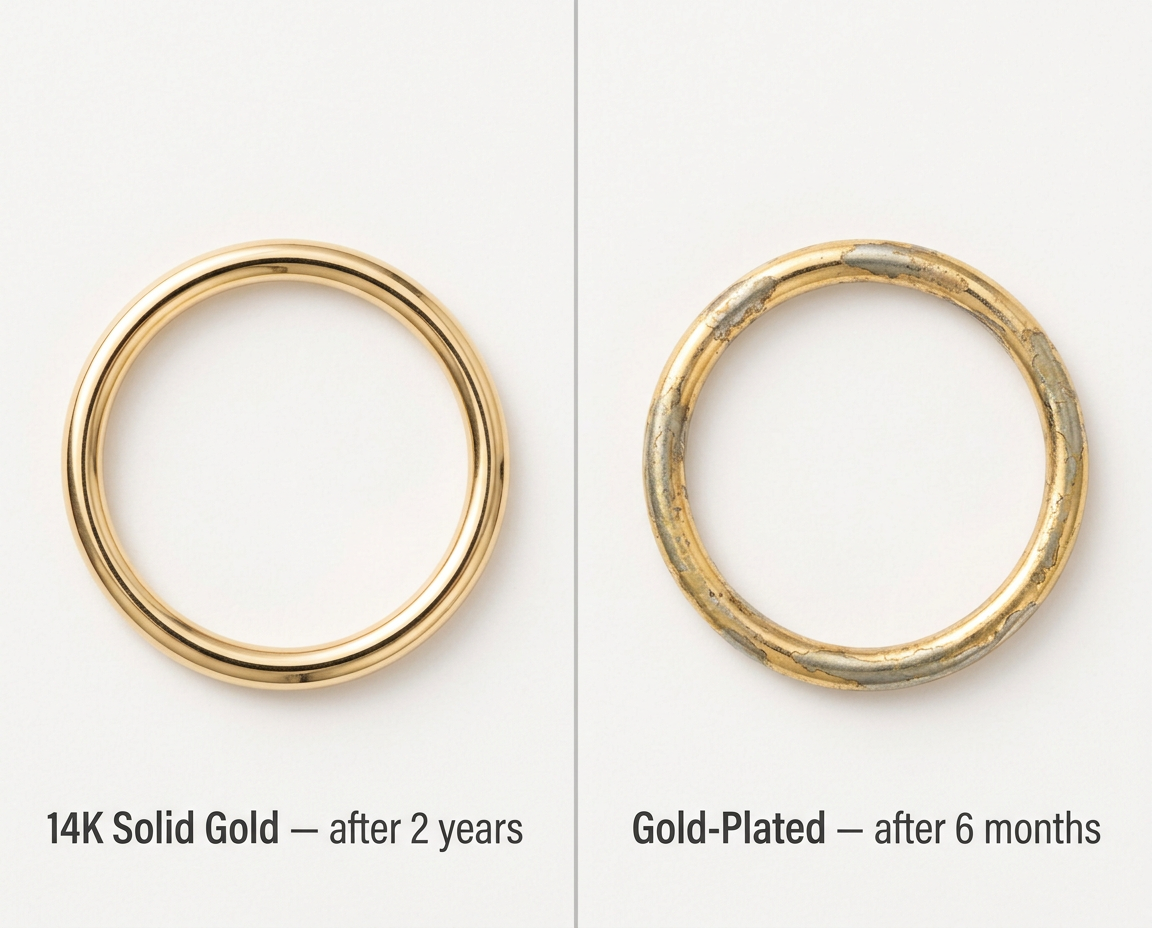
- A conch hoop has more surface area in contact with your skin than any other ear jewellery. More contact means more exposure to any coating breakdown — this is where 14K solid gold matters most
- The cheese-cutter effect is a real risk: a too-tight conch hoop presses against the helix rim and can slowly migrate through cartilage. Always ensure zero pressure where the hoop crosses the rim
What is a conch piercing?
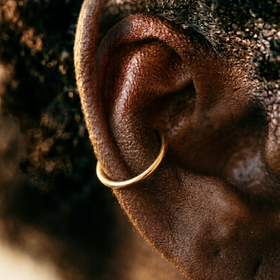
A conch piercing passes through the concha — the large, curved bowl of cartilage at the centre of the ear. The name comes from the conch shell, which the inner ear anatomy resembles. The concha is the widest flat surface on the ear, making it one of the most versatile piercing locations: it can hold a dainty stud, a decorative flat-back, or — once healed — a hoop that wraps around the entire outer edge of the ear.
That wrap-around hoop is what makes the conch piercing unique among ear piercings. A helix hoop sits on the rim. A daith hoop nestles inside a fold. But a conch hoop starts in the centre of the ear, curves outward across the antihelix ridge, over the helix rim, and connects behind the ear. It creates a bold orbital effect — a circle of gold framing the entire ear — that no other single piercing can achieve.
Conch piercings pass through the thickest cartilage in the ear. This makes the piercing more intense than a helix (which goes through the thin rim) and slower to heal. But the payoff is significant: the large canvas allows for more jewellery variety, the central location makes the piercing visible from both front and side, and a well-fitted hoop is one of the most visually striking single-piercing looks achievable.
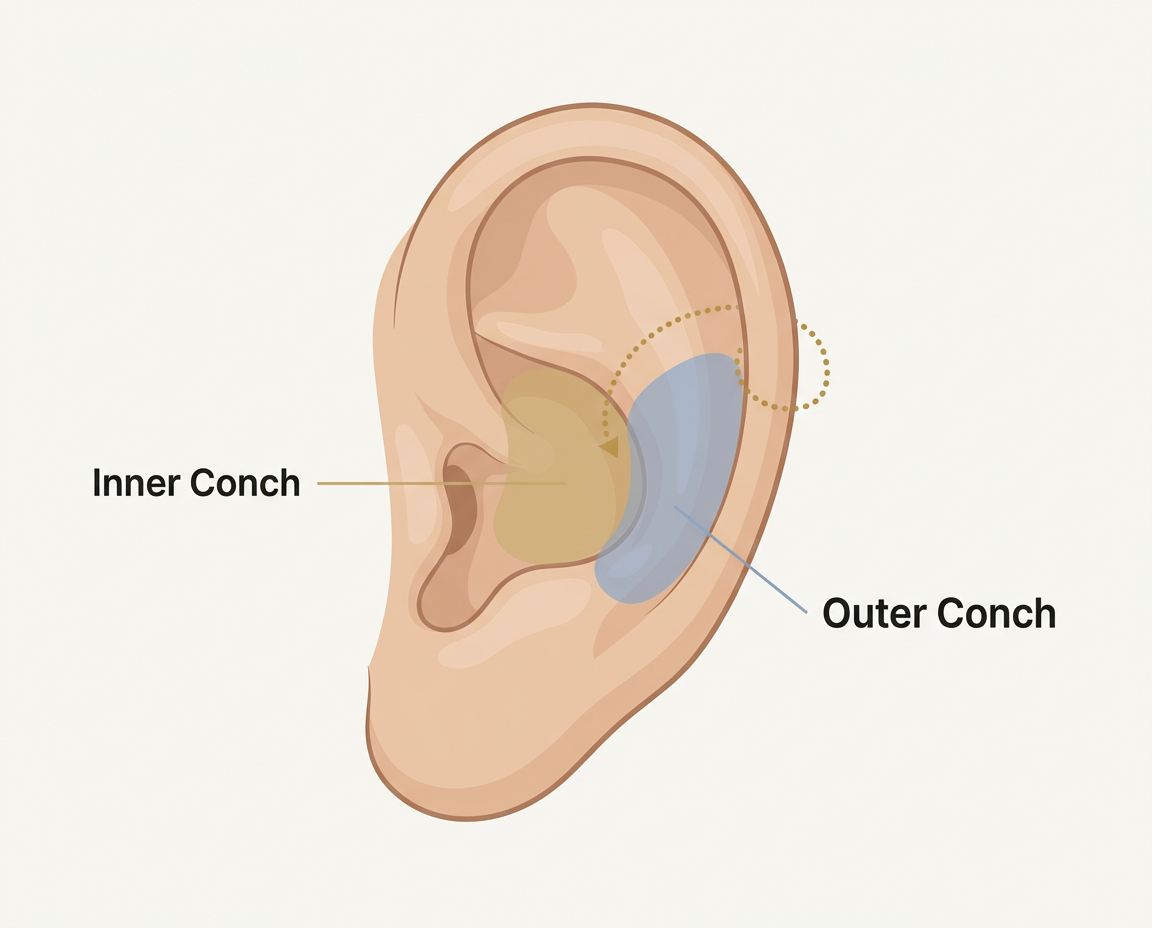
Inner conch vs outer conch — the distinction that determines your jewellery
This is the most important distinction in conch piercings, and the one that most guides gloss over. Inner and outer conch are different piercings in different locations with different jewellery options. They are not interchangeable names for the same piercing.
Inner Conch
- Located in the deep central bowl of the ear, closest to the ear canal
- Goes through the thickest part of the conchal cartilage
- The standard conch piercing — the one most piercers perform by default
- Accommodates both studs and hoops. A hoop wraps from the bowl, over the rim, creating the signature orbital look
- Works on most ear anatomies
Outer Conch
- Located in the flatter cartilage between the helix rim and the inner bowl
- Also called “contra conch” or “high conch” by some piercers
- Best suited for studs and flat-back jewellery
- Hoops are possible but may not sit comfortably — the antihelix ridge can prevent the ring from sitting flush, causing sustained pressure
- More anatomy-dependent than inner conch
Why your conch hoop material matters more than anywhere else
Every jewellery size guide will tell you to “choose quality materials.” Here is why it matters specifically for the conch — more than for a helix, a tragus, or a lobe.
Surface area. A 14K gold conch hoop at 12mm diameter has more gold wire in contact with skin than any other ear piercing jewellery. A 6mm helix hoop has roughly 19mm of wire circumference. A 12mm conch hoop has roughly 38mm — double the skin contact. More contact area means more exposure to any material that could irritate tissue.
Coating breakdown. Gold-plated and gold-filled rings have a thin gold layer over a base metal core. That layer wears down through friction with skin, moisture, and body chemistry. The more surface area under stress, the faster the coating fails. A plated hoop that might survive months on a 6mm helix can fail in weeks on a 12mm conch — exposing nickel-containing base metal to slow-healing cartilage tissue.
Healing timeline. Conch piercings take 6–12 months to heal. During this extended window, the jewellery material sits in intimate, constant contact with forming tissue. A reactive metal can turn a slow-healing piercing into a chronically irritated one. 14K solid gold (58.3% pure gold, nickel-free palladium-silver-copper alloy) does not corrode, tarnish, or shed material into the piercing channel.
| Material | Nickel | Coating | Conch suitability |
|---|---|---|---|
| 14K solid gold Recommended | None (nickel-free alloy) | No coating — solid throughout | Ideal. APP-approved. Will not corrode in prolonged cartilage contact |
| Implant-grade titanium (ASTM F-136) | None | No coating | Safe. Lightweight. The alternative to gold for initial piercings |
| Gold-plated Avoid | Base metal typically contains nickel | 0.5–5 micron gold layer wears off | Coating fails faster on conch due to large surface area |
| Gold-filled | Brass core may contain nickel | Thicker layer but still bonded to base metal | Better than plated but still degrades over months |
| Surgical steel (316L) Caution | Contains 10–14% nickel | None — nickel is in the alloy itself | May cause reactions in the moist, slow-healing conch environment |
How much does a conch piercing hurt?
5–6 out of 10 — one of the more intense ear cartilage piercings. The conch passes through the thickest cartilage in the ear, which means more resistance for the needle and more pressure sensation than a helix or lobe. Most people describe strong pressure followed by a sharp pinch lasting under a second, then throbbing warmth for 2–4 hours.
The pain is brief. The healing is long. This is the trade-off with conch piercings — a few seconds of intensity for months of gradual healing. The good news: the initial sharp pain fades within seconds, and most people report that the anticipation was worse than the reality.
| Piercing | Pain | Why |
|---|---|---|
| Lobe | 2–3/10 | Soft tissue, rich blood supply |
| Helix | 4–5/10 | Thin cartilage on the outer rim |
| Tragus | 5–6/10 | Small but thick cartilage |
| Conch This piercing | 5–6/10 | Thickest ear cartilage |
| Daith | 5–6/10 | Thick inner fold, limited access |
| Rook | 6–7/10 | Dense ridge, limited blood flow |
Healing timeline — what to expect month by month
6–12 months for full healing. Cartilage has limited blood supply compared to soft tissue, which means the immune system’s healing response is slower. The conch, being the thickest cartilage, is on the longer end of this range. Do not let external appearance fool you — the outside of the piercing can look perfectly healed at 3–4 months while the internal channel is still maturing.
| Phase | Timeline | What to expect | What to do |
|---|---|---|---|
| Fresh | Day 1–7 | Throbbing warmth for first few hours. Swelling peaks around day 3–4. Mild bleeding or clear discharge is normal. | Sterile saline spray 2x daily. Do not touch. Do not sleep on pierced side. |
| Early healing | Week 2–8 | Swelling gradually subsides. Dried lymph (crusties) form around the jewellery. Occasional tenderness when bumped. | Continue saline. Let shower water loosen crusties. Do not pick or rotate jewellery. Downsize the initial stud at 6–8 weeks once swelling is gone — oversized posts cause snagging. |
| Mid healing | Month 3–6 | Looks healed externally. May feel fine for weeks then suddenly flare up after a bump or sleep on it. This is normal — internal tissue is still fragile. | Reduce saline to 1x daily. Continue avoiding pressure. Do not switch to a hoop yet even if it looks healed. |
| Fully healed | Month 9–12 | No tenderness, no discharge, no redness, no reaction to pressure. Internal channel is mature. | Visit your piercer to confirm full healing. Now safe to transition to a seamless hoop. |
Switching from stud to hoop — the three-stage transition
This section exists because switching to a hoop too early is the single most common cause of conch piercing problems. We see it in customer messages, piercing forums, and TikTok comments every day: “I changed to a hoop at 4 months and got a bump that won’t go away.” The solution is a staged, patient transition.
Stage 1: Healing with a stud (Month 0–6)
Your piercer will insert a flat-back labret stud with a longer post (8–10mm bar) to accommodate initial swelling. This stud stays completely undisturbed. At around 6–8 weeks, once swelling has settled, return to your piercer to downsize to a shorter post (5–6mm). This prevents the oversized post from snagging and leveraging the piercing. The stud itself does not change style — it is still a flat-back labret, just shorter.
Stage 2: Confirming full healing (Month 6–12)
Continue wearing the downsized stud. The internal channel is maturing during this phase. At around 9–12 months, visit your piercer for a healing assessment. They will check for any residual tenderness, discharge, or tissue fragility. Do not self-assess. The external appearance can mislead you.
Stage 3: The hoop transition (Month 9–12+)
Once your piercer confirms full healing, you can transition to a seamless hoop. We strongly recommend having your piercer perform the first hoop insertion. The conch is one of the most difficult piercings to change yourself — the recessed location, thick cartilage, and large hoop diameter make self-insertion risky. A piercer can also trial different diameters on your ear to find the size that wraps smoothly without pressure.
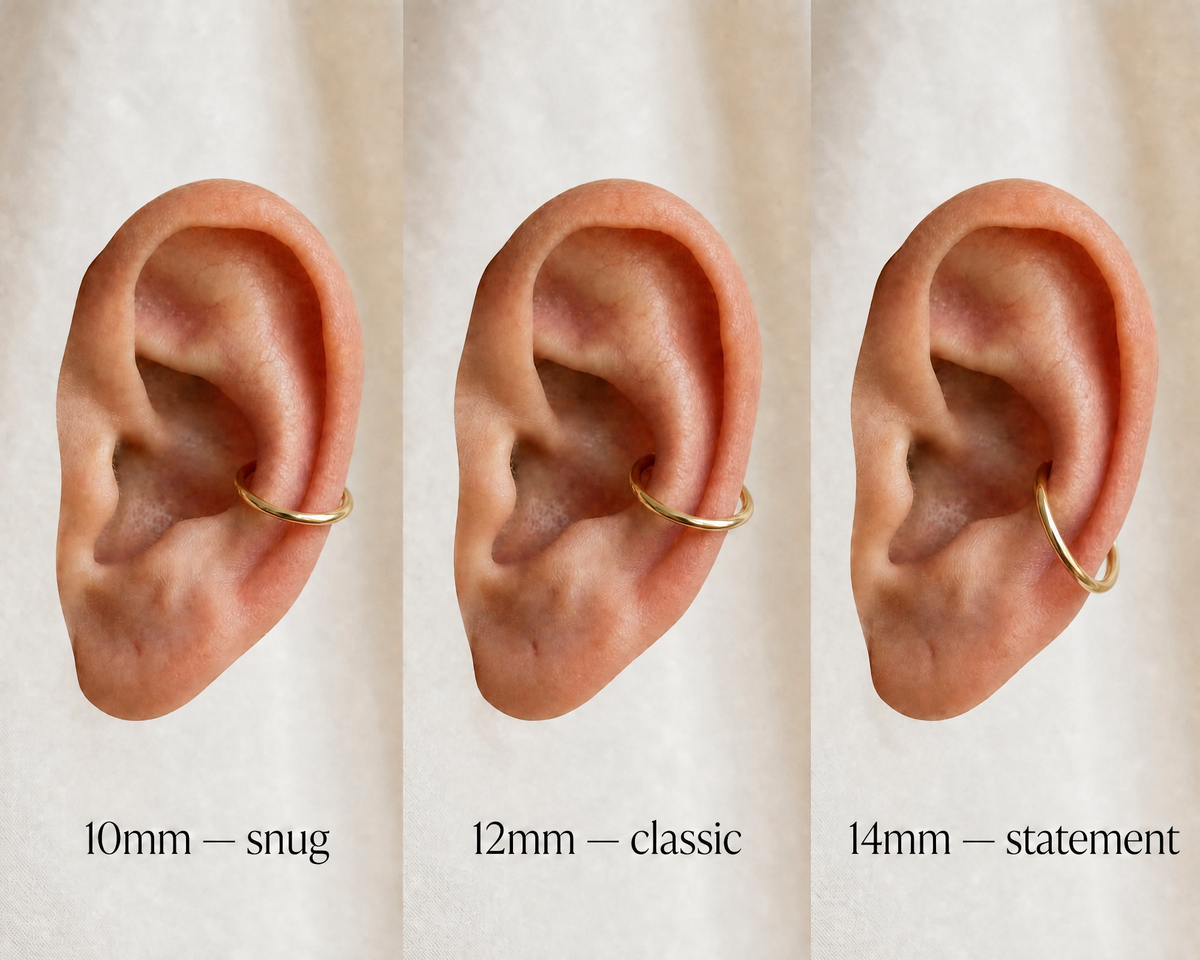
Conch hoop sizing — why conch hoops are the largest ear hoops
This catches people off guard. An 8mm hoop works for a helix. A 10mm works for a daith. But a conch hoop typically needs 10–15mm — significantly larger than any other ear piercing. The reason is geometry: the hoop must travel from the inner ear bowl, across the antihelix ridge, over the helix rim, and connect behind the ear. That is a much longer distance than any other ear hoop covers.
Gauge
Conch piercings are typically 16G (1.2mm) or 18G (1.0mm). The thicker gauge suits the dense cartilage and provides structural rigidity for the large hoop diameter. Check with your piercer — do not guess.
Diameter
| Diameter | Fit | Best for |
|---|---|---|
| 10mm | Tight, snug fit | Very petite ears or piercings placed close to the ear edge. Verify this fits before ordering — too small is worse than too large |
| 11mm | Close fit with minimal clearance | Smaller ears, inner conch placements near the rim |
| 12mm Most popular | Balanced, classic fit | Standard inner conch placement. Wraps neatly over the helix with comfortable clearance |
| 13mm | Relaxed fit | Medium-to-large ears or deeper inner conch placements |
| 14mm | Visible drape | Larger ears or outer conch piercings (where possible) |
| 15mm | Statement size | Bold, dramatic look. Maximum coverage wrapping the full ear edge |
How to measure at home
Paper strip method: Thread a narrow strip of paper through the piercing hole and bring it up and over the helix rim to where the bottom of the hoop would rest behind the ear. Mark and measure — this is your minimum inner diameter. Add 1–2mm for comfortable clearance.
Piercer measurement: Given the complexity of conch hoop sizing, we recommend having your piercer measure. They can trial different diameters in person to find the size that wraps smoothly without pressure.
Headphones & earbuds with a conch piercing
This is the daily-life question that matters most to conch wearers — and the answer changes depending on your healing stage and jewellery type.
| During healing (stud) | Healed (stud) | Healed (hoop) | |
|---|---|---|---|
| In-ear earbuds (AirPods, etc.) | Avoid. Earbuds press against the stud, introduce bacteria, and create sustained pressure on healing cartilage | Usually fine. The stud sits in the bowl; the earbud fits around it | Depends on anatomy. The hoop wraps over the outer rim, so it generally does not block the ear canal. Some people find earbuds fit alongside the hoop; others find interference |
| Over-ear headphones | Usually fine. The cups sit over the outer ear without pressing into the bowl | Fine | May press the hoop inward against cartilage if the hoop protrudes. Avoid tight-fitting over-ear headphones with a conch hoop |
| Bone conduction | No contact with the ear — safe at all stages | Safe | Safe |
Building an ear stack with a conch hoop as anchor
In ear-stacking terminology, the conch hoop is your “anchor” — the largest, most visually dominant piece. It wraps the outer ear and commands attention. Everything else in the composition plays a supporting role.
Three stacking principles
Odd numbers. Three or five elements tend to create more balanced, visually interesting compositions than two or four. A conch hoop plus two helix hoops is the classic trio.
Graduated sizes. The conch hoop should be the largest element. Helix hoops should be smaller (6–8mm), a tragus or rook stud should be daintier still. This size hierarchy creates visual flow from anchor to accent.
Colour consistency. Because the conch hoop is so visible, any metal mismatch with other jewellery becomes immediately apparent. If your conch hoop is yellow gold, keep your helix and lobe pieces in yellow gold too.
Specific stacking combinations
| Style | Combination | Effect |
|---|---|---|
| The Classic Trio | Conch hoop 12mm + Helix hoop 8mm + Lobe hoop 10mm | Clean, minimal, three points of gold framing the ear |
| The Full Stack | Conch hoop 12mm + 2× Helix 6mm & 8mm + Tragus stud + Lobe 10mm | Five elements, graduated sizes, curated ear composition |
| The Inner Ear | Conch hoop 12mm + Daith hoop 10mm + Rook hoop 7mm | All inner piercings, dramatic layered look from within the ear |
| Minimal Statement | Conch hoop 12mm alone — nothing else | One bold ring wrapping the ear. Understated drama. |
How to insert a seamless conch hoop
We strongly recommend having your piercer perform the first conch hoop insertion. The conch is one of the most difficult piercings to change yourself — the recessed location, thick cartilage, and large hoop diameter make self-insertion risky. Most piercers offer jewellery changes for free or a small fee.
If you do insert yourself after gaining confidence:
Wash hands, wear nitrile gloves
Clean hands are essential. Gloves provide dramatically better grip on smooth gold wire — critical for controlling a 10–15mm ring.
Find the seam
Run your fingernail around the ring until you feel a slight catch where the precision-cut ends meet.
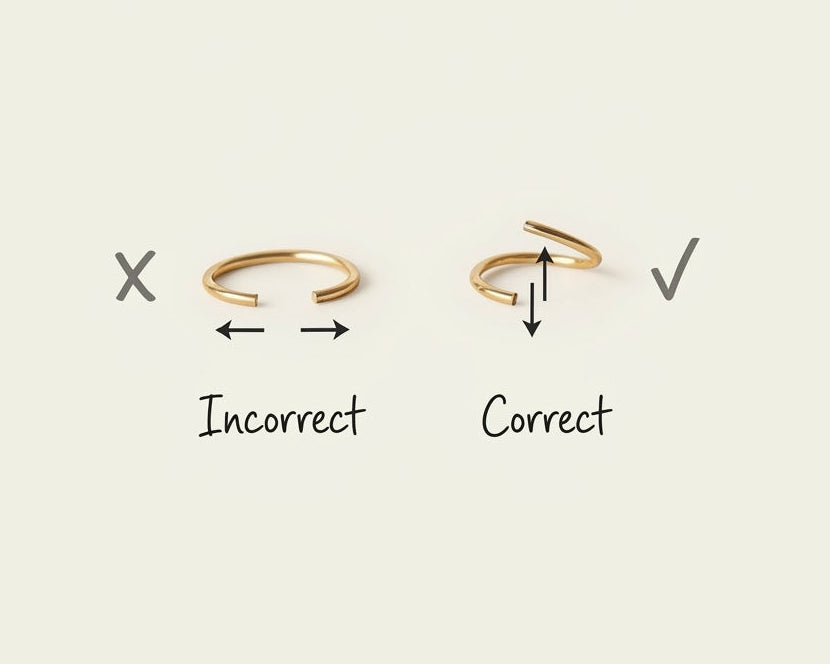
Twist open — never pull apart
Push one end forward, pull the other backward. Open just 2–3mm. Pulling sideways creates an oval that will never close flush again. Our rings are annealed (heat-treated) so they twist open easily with fingers — no pliers needed.
Thread from the front of the ear
Guide one end into the front of the piercing hole and push through to the back. A drop of sterile saline on the wire reduces friction. The ring should pass through smoothly without force.
Twist closed, position the seam
Reverse the twist until the ends meet flush. Rotate the ring so the seam sits behind the ear, hidden from view. Run your fingernail over the join — you should feel no gap.
Aftercare
Correct aftercare
- Sterile saline spray (0.9% NaCl) 2x daily — front and back of the conch
- Let warm shower water loosen crusties — do not pick them off
- Pat dry with a clean tissue (not a fabric towel)
- Sleep on the opposite side — use a travel pillow if you are a side sleeper
- Tie long hair back on the pierced side — hair tangles in conch hoops easily
- Cup your hand over the ear when pulling clothing over your head
Common mistakes
- Touch, twist, or rotate the jewellery at any stage
- Use over-ear headphones that press the hoop inward during healing
- Use TCP, Dettol, hydrogen peroxide, alcohol, or tea tree oil on the piercing
- Submerge in pools, hot tubs, or natural water until fully healed
- Change jewellery before your piercer confirms full healing
- Sleep directly on the pierced ear — sustained pressure on the conch slows healing