Size Guide: How to Find Your Perfect Seamless Hoop Size
Ordered the wrong size hoop before? You are not alone. Wrong gauge causes friction bumps that mimic metal allergies. Wrong diameter means a hoop that pinches, droops, or slowly migrates through cartilage. This guide exists so that never happens again — we cover gauge, diameter, measuring methods, the stud-to-hoop transition, and the right size for every piercing from nostril to conch.
Gauges
16G · 18G · 20G · 22G
4 wire thicknesses
Diameters
6–15mm
10 sizes available
Material
14K Solid Gold
Nickel-free · Implant-safe
✓
14K solid gold — 58.3% pure gold, nickel-free
✓
Made with nickel-free 14K solid gold suitable for healed piercings
Quick answer: A seamless hoop has no clasp to compensate for wrong sizing. Too small and it pinches or migrates through tissue. Too large and it droops, catches on things, and causes irritation bumps. You need two numbers: your gauge (wire thickness) and your diameter (inner opening).
A seamless hoop is a single circle of 14K gold wire with no clasp, ball, or hinge. Once closed, it should feel like it is not there. But this simplicity means there is no mechanism to compensate for a wrong size — unlike a clicker that snaps shut regardless of fit, a seamless ring either matches your anatomy or it causes problems.
Too small: The hoop pinches the tissue, creating sustained pressure. Over time, this can cause the wire to slowly migrate through the skin or cartilage — what piercers call the “cheese-cutter effect.” The ring is also harder to twist open because there is less wire to grip.
Too large: The hoop droops, catches on hair, fabric, and pillows, and creates leverage on the piercing channel. The constant movement triggers irritation bumps that people often mistake for a metal allergy — when the real problem is simply mechanical friction from a ring that is too big.
Wrong gauge: A wire that is too thick will not pass through the piercing hole. A wire that is too thin wobbles inside a wider channel, creating friction that irritates tissue. Both problems are completely avoidable by confirming two numbers before you order: your gauge and your diameter.
Which piercing do you have — and where is it?
Quick answer: Your piercing name determines the gauge range, diameter range, and healing timeline. Common ear piercings include helix, forward helix, tragus, rook, daith, conch, and lobe. Nose piercings include nostril and septum. Each location needs a different hoop size.
Before choosing a size, you need to know exactly which piercing you have. The name determines the gauge range, diameter range, and healing timeline. If you are not sure which category your piercing falls into, these anatomy maps will help you identify it.
Ear piercing locations — each requires a different diameter range
Nose piercing locations — nostril and septum use different gauges
What gauge is best for your piercing?
Quick answer: 20G (0.8mm) is the most common gauge for nostril, helix, tragus, rook, and lobe piercings. 18G (1.0mm) is slightly thicker and popular for septum, daith, and helix piercings. 16G (1.2mm) is used for daith and conch piercings. 22G (0.6mm) is the thinnest and best for delicate nostril piercings.
Gauge refers to the thickness of the gold wire that passes through your piercing channel. The numbering is counterintuitive: a lower number means thicker wire. Getting your gauge right is the single most important sizing decision — diameter can be adjusted slightly for preference, but gauge must match your piercing exactly.
16G
1.2mm wire
Our thickest wire. Used for daith and conch piercings where thick cartilage needs a robust ring.
18G
1.0mm wire
Versatile and sturdy. Popular for septum, daith, conch, helix, lobe and most ear piercings.
20G
0.8mm wire
Same thickness as a standard earring post. Most common for helix, tragus, rook, lobe, septum, nostril.
22G
0.6mm wire
Our thinnest, most delicate wire. Perfect for nostril piercings and ultra-fine ear jewellery.
How to find your gauge
The most reliable method: ask your piercer. If you cannot visit, compare your current jewellery: a standard fashion earring post is approximately 20G. Noticeably thicker? Likely 18G. Septum and daith with a substantial ring? Often 16G. Very fine nostril stud? Usually 22G.
What happens if you get the gauge wrong
Too thick (e.g., 16G ring in an 18G piercing): the wire will not pass through. Forcing it tears tissue and triggers irritation bumps. Too thin (e.g., 22G ring in a 20G piercing): the ring wobbles inside the wider channel, creating constant friction. This friction causes soreness and bumps often mistaken for a metal allergy — when the real problem is gauge mismatch.
What hoop diameter should you choose?
Quick answer: Diameter is the inner measurement of the hoop in millimetres. After measuring from your piercing hole to the nearest tissue edge, add 1mm for a snug fit or 2mm for a relaxed fit. If you fall between sizes, choose the smaller one — a slightly snug hoop is always better than one that is too loose.
Diameter is the inside measurement of the hoop — the distance across the inner opening, not the outer edge. This is the industry standard for body jewellery and is how all our sizes are measured. A smaller diameter sits snugly against the skin; a larger one creates more visible drape.
6mm
7mm
8mm
9mm
10mm
11mm
12mm
13mm
14mm
15mm
Inner diameter vs outer diameter — the sizing trap
Some sellers list outer diameter, which includes the wire thickness on both sides. At 18G, a “10mm outer diameter” ring has an inner diameter of only about 8mm. All Stepoy sizes are inner diameter. When comparing with other brands, always check which measurement they use.
Snug vs relaxed fit
After measuring (see below), add 1mm for a snug, close-fitting hoop. Add 2mm for a relaxed fit with visible drape. Example: if your measurement is 7mm, choose 8mm for snug or 9mm for relaxed.
Between sizes? Go smaller
If your measurement falls between two sizes — say 7.5mm — choose the smaller size (8mm snug fit). A slightly snug hoop looks intentional and elegant. A slightly too-large hoop droops, catches on things, and creates leverage on the piercing channel. When in doubt, snugger is always safer than looser.
How do you measure your piercing for a seamless hoop?
Quick answer: Hold a millimetre ruler at your piercing hole and measure to the nearest tissue edge (ear rim for ear piercings, nostril curve for nose piercings). Add 1mm for a snug fit or 2mm for a relaxed fit. Alternatively, lay an existing well-fitting hoop flat on a ruler and measure the inner diameter.
The same principle works for all locations: you are measuring the distance from the piercing hole to the nearest tissue edge that the hoop must clear.
1
Position a ruler at the piercing hole
Hold a millimetre ruler so that the zero mark sits at the centre of your piercing hole. For ears, use a mirror or ask someone to help.
2
Measure to the nearest tissue edge
Ear piercings: measure to the outer edge of the ear rim. Nostril: measure to the bottom curve of the nostril. Septum: measure to the lowest point of the nose tip. Note the distance in mm — this is your base measurement (M).
3
Add 1–2mm for your preferred fit
M + 1mm = snug hoop. M + 2mm = relaxed hoop. Choose the size within our 6–15mm range that matches.
Measuring for ear piercings
Measuring for nose piercings
Easiest method: measure an existing ring
If you already have a hoop that fits well, lay it flat on a ruler and measure from one inner edge to the opposite inner edge. No calculation needed.
Why piercing placement — not body size — determines your diameter
Your nose size or ear size does not determine your diameter. What matters is where the piercer placed the hole relative to the tissue edge. A low nostril piercing needs a smaller ring than a high nostril piercing — even on the same nose. A low helix needs a smaller ring than a high helix — even on the same ear. This is why size ranges span 4–5mm per location: the range accounts for different placement heights, not different body sizes.
What size seamless hoop fits each piercing location?
Quick answer: Most people choose these sizes: Nostril 7–8mm in 20G. Septum 10mm in 18G. Helix 7–8mm in 20G. Daith 10mm in 16G or 18G. Conch 12mm in 16G or 18G. Tragus 7mm in 20G. Lobe 10mm in 20G. Your exact size depends on piercing placement, not body size.
Each card below explains the size range, why the range exists, and which end suits which placement. Where available, on-body photos show what different sizes look like in practice.
Most people choose
Nostril: 7–8mm · 20G
Septum: 10mm · 18G
Helix: 7–8mm · 18G or 20G
Daith: 10mm · 16G or 18G
Conch: 12mm · 16G or 18G
Tragus: 7mm · 18G or 20G
Rook: 7mm · 18G or 20G
Lobe: 10mm · 18G or 20G
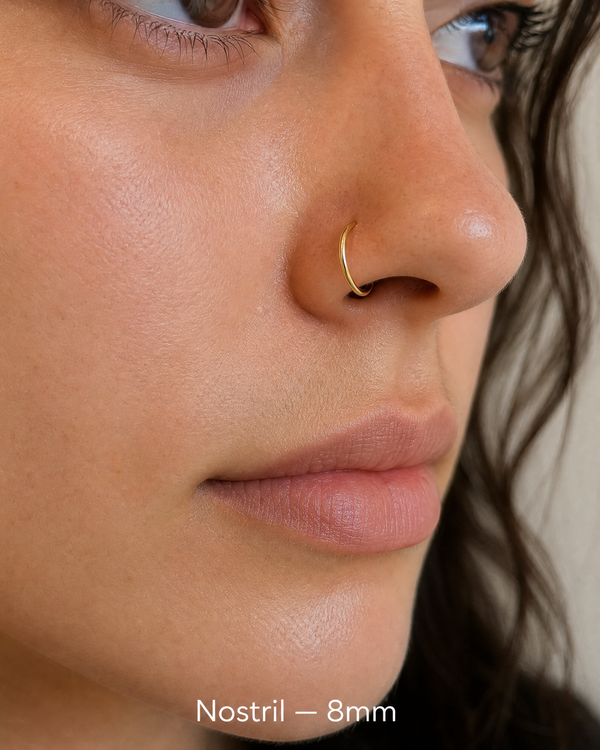
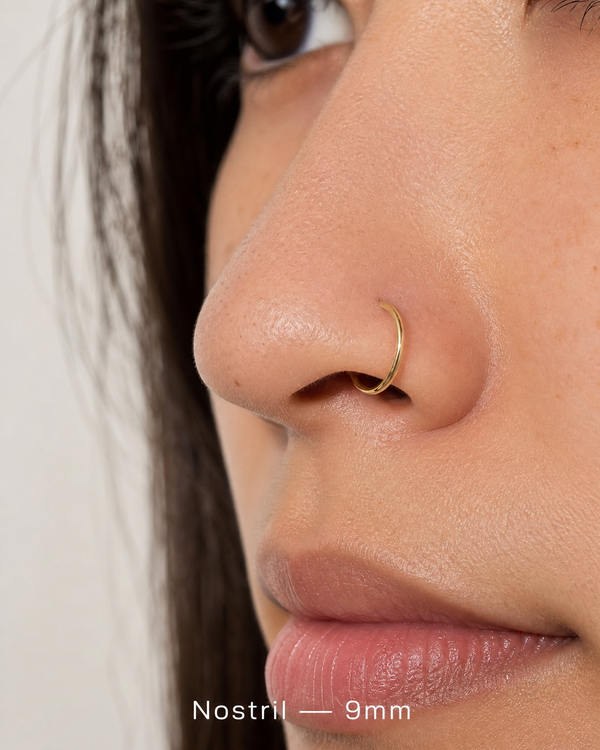
Nose piercings
Nostril
6–9mm · 20G / 22G
Most people choose: 7–8mm in 20G
6mm hugs the nostril for a barely-there look. 7–8mm is the most popular — visible but proportionate. 9mm for higher placements or a fashion-forward look.
Why the range: Low piercing (near the nostril curve) = 6–7mm. Standard height = 7–8mm. Higher placement (toward the bridge) = 8–9mm.
Septum
8–12mm · 18G / 20G
Most people choose: 10mm in 18G
8mm sits high and tight. 10mm is the classic septum look. 12mm hangs lower for a bold statement.
Why the range: Low columella placement = 8–9mm. Standard placement = 10mm. Higher placement = 11–12mm for the ring to drape below the nose tip.
6mm for a low helix — tight hugger. 7–8mm for mid helix — the most popular range. 9–10mm for high helix with drape.
Why the range: Low helix (close to ear edge) = small diameter. High helix (far from edge) = larger diameter needed.
Forward Helix
6–8mm · 18G / 20G
Most people choose: 7mm in 20G
Tight area with thin cartilage. 6mm for flush fit. 7mm for most anatomies. 8mm if the fold is deeper.
Hidden Helix
6–8mm · 18G / 20G
Most people choose: 7mm in 20G
Tucked behind the outer helix fold. 6mm very flush. 7mm fits most. 8mm for larger folds.
Auricle
8–12mm · 18G / 20G
Most people choose: 9–10mm in 20G
Mid-ear rim. 8–9mm for close fit. 10–12mm for a more decorative, visible hoop.
Rook
6–8mm · 18G / 20G
Most people choose: 7mm in 20G
Upper anti-helix fold. 6mm for small folds. 7mm fits the majority. 8mm for larger ridges.
Tragus
6–8mm · 18G / 20G
Most people choose: 7mm in 20G
Compact area. 6mm snug and minimal. 7mm fits most. 8mm for larger tragus.
Daith
8–12mm · 16G / 18G
Most people choose: 10mm in 16G or 18G
Innermost cartilage fold above ear canal. 8–9mm for small folds. 10mm most common. 11–12mm for visible, decorative ring.
Comfort note: Seamless hoops have no ball pressing against the ear canal — the most comfortable daith style for everyday wear.
Conch
10–15mm · 16G / 18G
Most people choose: 12mm in 16G or 18G
Must wrap from inner bowl, over helix rim, to back of ear. 10–11mm for petite ears. 12mm most popular. 13–15mm for larger ears or dramatic styling.
Critical: A too-tight conch hoop presses against the helix rim — cheese-cutter risk. Always ensure zero pressure where the hoop crosses the rim.
Lobe
8–15mm · 18G / 20G
Most people choose: 10mm in 20G
Widest range. 8–9mm for a sleek huggie. 10–11mm for classic everyday hoop. 12–15mm for bold statement. 2nd/3rd holes: 8–10mm pairs well with a larger 1st-hole hoop.
Helix — size comparison on ear
6mm
8mm
10mm
Daith — size comparison in ear
8mm
10mm
Conch, Tragus & Rook — on ear
Conch · 10mm
Tragus · 6mm
Rook · 6mm
Shop Ear Hoops
14K Gold Seamless Ear Hoop
Handmade, annealed seamless hoop. 14K solid gold, nickel-free. Helix, daith, conch, tragus, rook, lobe — every size and gauge in stock.
Quick answer: Lobe and septum piercings can switch to a hoop after 3–4 months. Nostril piercings need 4–6 months. Cartilage piercings (helix, tragus, rook, conch) need 9–12 months. Daith piercings need 12 months or more. Switching too early is the number-one cause of irritation bumps after a hoop change.
This is the number-one source of anxiety for people buying their first seamless hoop. The question is always the same: “My piercing is X months old — can I switch to a hoop now?” The answer depends on your piercing location, because different tissues heal at very different speeds.
Healing timeline by piercing location
Piercing
Minimum wait
Recommended wait
Why hoops need longer
Nostril
3 months
4–6 months
Nostril tissue is relatively thin; heals faster but internal channel needs time
Septum
6 weeks
3–4 months
Columella is soft tissue; heals quickly but seamless ring manipulation can irritate early
Helix
6 months
9–12 months
Cartilage heals from outside in; looks healed months before internal channel is ready
Forward helix
6 months
9–12 months
Same cartilage healing as standard helix
Rook
6 months
9–12 months
Thick cartilage fold with limited blood flow
Tragus
4 months
6–9 months
Small but thick cartilage; snag risk from headphones
Daith
9 months
12+ months
Thickest cartilage in the ear; very slow blood supply
Conch
6 months
9–12 months
Dense flat cartilage; large hoop creates significant movement
Lobe
6 weeks
3–4 months
Soft tissue; fastest ear healing
The three reasons people get bumps after switching to a hoop
1. Switched too early — the internal channel was not fully mature, and hoop movement disrupted healing tissue. 2. Wrong diameter — too small creates pressure; too large creates leverage and constant movement. 3. Wrong material — switched from implant-grade titanium to a plated or nickel-containing ring, causing contact dermatitis. If you experience bumps after switching, the cause is almost always one of these three. 14K solid gold in the correct size eliminates causes #2 and #3.
How to know if your piercing is ready
External signs of healing (no redness, no crusties, no pain) are necessary but not sufficient. The internal channel heals last. The only reliable confirmation is a visit to your piercer — they can assess whether the channel is mature enough for a hoop. Do not rely solely on how the outside looks.
How do you insert a seamless hoop?
Quick answer: Twist the ends apart (never pull sideways) to open a 2–3mm gap. Thread one end through the piercing, then twist closed until the ends meet flush. A drop of sterile saline on the wire reduces friction. Nitrile gloves improve grip, especially on smaller sizes.
Our seamless hoops have no clasp or hinge — the precision-cut ends twist apart and press back together. The technique matters: the wrong motion permanently distorts the ring.
1
Clean your hands
Wash thoroughly. Nitrile gloves dramatically improve grip — highly recommended, especially for 6–8mm sizes.
2
Find the seam
Run your fingernail around the ring until you feel a slight catch where the ends meet.
3
Twist to open — never pull apart
Push one end away from you, pull the other toward you. Open just 2–3mm. This preserves the circular shape.
4
Thread through the piercing
Guide one end into the piercing hole. A drop of sterile saline on the wire reduces friction. Never force.
5
Twist closed and position
Reverse the twist until ends meet flush. Position the seam where it is least visible (inside the nostril, behind the ear).
✓ Do this
Twist the ends in opposite directions. This preserves the circle and ensures the ring closes flush every time.
✗ Don’t do this
Don’t pull the ends apart sideways. This bends the ring into an oval that will never close properly again.
All our rings are annealed (heat-treated)
Annealing softens the 14K gold wire, making it springy and responsive. You can twist open our rings with your fingers — no pliers needed. Non-annealed gold wire (common with other brands) can be frustratingly stiff. If you have tried another brand’s seamless ring and found it too hard to open, the difference is likely annealing.
Sleeping with your seamless hoop
A seamless hoop is the most comfortable jewellery style for sleeping — there is no ball, clasp, or hinge to dig into your skin. Once your piercing is fully healed, you can sleep on the pierced side without discomfort. During healing, avoid sleeping directly on the pierced ear or nose — the sustained pressure can cause irritation bumps and slow the healing process. A travel pillow with a hole in the centre keeps pressure off the pierced ear while you sleep on your side.
Why is my seamless hoop not fitting properly?
Quick answer: The three most common problems are: (1) the seam will not close flush because the ring was pulled apart sideways instead of twisted, (2) the ring spins constantly because the diameter is too large or the gauge is too thin, and (3) the ring popped open because the ends were not fully aligned when closed.
My ring will not close flush / the seam keeps showing
This almost always means the ring was pulled open (sideways) instead of twisted open. Pulling distorts the wire into an oval that will never align properly. To attempt a fix: wear nitrile gloves for grip, hold each side of the seam, and twist the ends back into alignment (one forward, one backward). If the ring is visibly oval or the gap persists after twisting, the ring has been permanently deformed and needs to be replaced.
Another cause: the ring was over-opened beyond 3mm. Seamless rings should only be twisted open the minimum distance needed for the wire to clear the piercing hole. Over-opening stretches the metal and creates a spring-back gap.
My ring keeps spinning / rotating
Slight rotation is normal and not harmful. If you want the seam hidden, position it after insertion and it will usually stay in place. If the ring spins freely and constantly, it is a sign that the diameter is too large (too much play inside the piercing) or the gauge is too thin (ring wobbles in a wider channel). Try sizing down by 1mm in diameter, or confirm your gauge is correct with your piercer.
My ring popped open on its own
This can happen if the ends were not fully aligned when you closed the ring. After twisting closed, run your fingernail over the seam — you should feel no gap or catch. If the ring opens repeatedly, it may have been over-opened at some point and lost its spring tension. A piercer can often re-close a ring properly with ring-closing pliers, but in some cases the ring needs replacing.
I got an irritation bump after switching to a hoop
Key takeaway: If you got a bump after switching to a hoop, check these three things in this order: (1) Was the piercing fully healed? (2) Is the hoop the right diameter? (3) Is the metal genuinely solid gold or titanium, not plated? The cause is almost always one of these three.
Check these three things in order: (1) Timing: did you switch before the piercing was fully healed? If so, switch back to a stud and wait. (2) Size: is the hoop too small (pressing on tissue) or too large (moving too much)? Measure and compare. (3) Material: is the ring genuinely 14K solid gold, or is it plated/filled? Plated coatings break down and expose nickel. If the ring is the right size and genuinely solid gold, and the bump appeared within the first week of switching, the most likely cause is #1 — the piercing was not ready.
What are the most common hoop sizing mistakes?
Quick answer: The five most common mistakes are: not confirming your gauge before ordering, confusing inner and outer diameter, copying a friend’s size, using helix sizing for a conch, and pulling the ring open sideways instead of twisting it.
1. Not confirming gauge before ordering. An 18G ring will not fit through a 20G piercing. A 20G ring in an 18G hole wobbles and irritates. Always confirm with your piercer.
2. Confusing inner and outer diameter. An “8mm outer diameter” ring has only ~6mm inner diameter at 20G. All Stepoy sizes are inner diameter.
3. Copying a friend’s size. Your piercing placement is different from theirs. Always measure from your own piercing hole to your own tissue edge.
4. Using helix sizing for a conch. 8mm works for a helix but is far too small for a conch (which needs 10–15mm to wrap over the helix rim).
5. Opening by pulling instead of twisting. Creates an oval that will never close flush. Twist: one end forward, one end backward.
Quick size finder
Select your piercing location and desired fit for a personalised recommendation.
The most popular sizes across all piercings are 7mm and 8mm in 20G for nostril and helix piercings, 10mm in 18G for septum and daith piercings, and 12mm in 16G or 18G for conch piercings. Your ideal size depends on where the piercer placed the hole relative to the tissue edge, not on your body size.
What sizes and gauges do you offer?
Inner diameters from 6mm to 15mm in 1mm increments (10 sizes). Four gauges: 16G, 18G, 20G, 22G. Two gold colours: yellow gold and rose gold. This gives you the precise size for any piercing location.
Is the diameter measured inside or outside the ring?
All our sizes are inner diameter — the distance across the inner opening. This is the industry standard. Be cautious comparing with other brands: some list outer diameter, which can differ by 1–2mm.
How do I know what gauge my piercing is?
Ask your piercer. Quick reference: 20G = standard earring post. 18G = slightly thicker. 16G = thickest (daith, conch). 22G = very fine (nostril studs).
Is 8mm too small for a nostril piercing?
No — 8mm is within the normal nostril range (6–9mm) and is one of the most popular sizes. Whether 8mm fits you depends on your piercing placement. A standard-height nostril piercing typically needs 7–8mm. A very low piercing may need only 6mm, and a higher placement may need 9mm. Measure from the hole to the bottom of your nostril to confirm.
Is 20G too thin for cartilage piercings?
No. 20G (0.8mm) is the same thickness as a standard earring post and is commonly used for helix, tragus, rook, and forward helix piercings. It is a perfectly suitable gauge for cartilage. For thicker cartilage piercings like daith and conch, 16G or 18G is more common because those areas benefit from a sturdier wire.
What happens if my hoop is too tight?
A too-tight hoop creates sustained pressure on the tissue, which can lead to what piercers call the “cheese-cutter effect” — the wire slowly migrates through skin or cartilage. Signs include persistent redness, a visible crease or indentation where the wire sits, and discomfort that does not improve. If you suspect your hoop is too tight, size up by 1mm.
Can a wrong hoop size cause irritation bumps?
Yes. A hoop that is too large creates leverage and constant movement in the piercing channel, triggering irritation bumps that people often mistake for a metal allergy. A hoop that is too small creates sustained pressure that can also irritate tissue. A correctly sized hoop in a fully healed piercing should not cause bumps.
What size conch hoop fits most ears?
12mm is the most popular conch hoop size. A conch hoop must wrap from the inner bowl of the ear, over the helix rim, to the back of the ear — so it needs more diameter than other piercings. Petite ears may need 10–11mm. Larger ears or those wanting dramatic styling may prefer 13–15mm. A too-small conch hoop presses against the helix rim and can cause problems.
Why does my hoop move too much?
Constant spinning or movement means the diameter is too large (too much room inside the piercing) or the gauge is too thin (the wire wobbles in a wider channel). Try sizing down by 1mm in diameter. If the issue persists, confirm with your piercer that your gauge is correct.
Can I wear a different gauge than my piercing was done at?
Match the original gauge. Thicker will not fit; thinner will wobble and irritate. If you want to change gauge, consult your piercer — stretching should be gradual and intentional.
Do seamless hoops have a clasp?
No. The precision-cut ends twist apart and press back together for an invisible seam. No clasp, hinge, or ball. This is why they are the most comfortable style for 24/7 wear.
What if I order the wrong size?
Each ring is handmade to order, so we cannot accept returns for incorrect sizing. That is why this guide exists. If you are stuck between sizes, message us and we will help you choose.
Can I sleep with a seamless hoop?
Yes — once the piercing is fully healed. Seamless hoops are the most comfortable sleeping style because there is no hardware to dig into skin. During healing, avoid sleeping directly on the pierced side — use a travel pillow with a central hole.
Why is 14K solid gold better than plated for a hoop I wear 24/7?
Plated jewellery has a thin gold coating (0.5–5 microns) over a base metal, and that coating wears down with constant skin contact. When it does, the exposed base metal — usually containing nickel — contacts your tissue. 14K solid gold (58.3% pure gold) is the same material throughout. It cannot wear down, corrode, or expose a different metal. 14K solid gold is widely used for high-quality body jewellery when nickel-free and properly manufactured.
Why are your rings easier to open than other brands?
All our rings are annealed — heat-treated to soften the gold wire. This makes them springy and easy to twist open with your fingers. Many brands skip annealing, resulting in stiff wire that requires pliers.
I got a bump after switching to a hoop. Is it the ring?
Check three things: (1) Did you switch before the piercing was fully healed? (2) Is the diameter correct for your anatomy? (3) Is the metal genuinely 14K solid gold? The cause is almost always premature switching, wrong size, or reactive metal. A correctly sized 14K gold hoop in a fully healed piercing should not cause bumps.
Still not sure about your size?
Send us a message with your piercing type and a photo if possible — we will recommend the best size for you.
Sizing recommendations based on common professional piercing standards and body jewellery industry practices. Always consult your piercer for personalised advice.
Choosing a selection results in a full page refresh.