
Conch Piercing Perfection: Styling Your 14K Gold Seamless Conch Hoop
- Conch piercings are typically 16G or 18G — the thicker gauges suit the dense, flat cartilage in the centre of the ear
- A 12mm 14K gold conch hoop is the most common diameter — large enough to wrap from the inner bowl, over the helix rim, and around to the back of the ear
- Conch hoops require the largest diameter of any ear hoop because the ring must traverse from the inner ear bowl, across the antihelix ridge, and over the helix rim
- The cheese-cutter effect is a real risk: a too-tight conch hoop presses against the helix rim and can slowly migrate through the cartilage. Always ensure zero pressure where the hoop crosses the rim
- Heal with a stud first (6–12 months), then switch to a hoop. Conch hoops move significantly with every head turn, making them unsuitable during healing
Understanding the conch piercing — inner vs outer
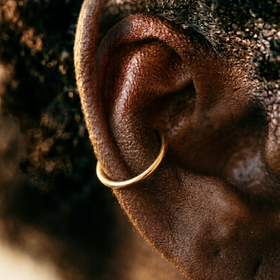
The conch piercing sits in the large, flat bowl of cartilage at the centre of the ear — the area that resembles the inside of a conch shell. There are two variations, and this distinction matters when choosing a hoop:
Inner conch: Pierced through the centre of the ear bowl, closest to the ear canal. This is the standard conch position and the one used for hoop-style jewellery, where the ring wraps outward around the helix rim.
Outer conch: Pierced closer to the antihelix, between the helix rim and the inner bowl. Less common, more typically worn with studs. Hoops are possible but may require even larger diameters.
Why a luxury 14K gold conch ring is worth the investment
The conch is thick cartilage with limited blood supply. Healing takes 6–12 months. During this window, the jewellery material matters enormously. But there is a second reason 14K gold is especially justified for a conch hoop:
Surface area. A 14K gold conch seamless hoop at 12mm has more gold wire in contact with skin than any other ear piercing jewellery. More contact area means more exposure to any coating breakdown or metal corrosion products. A plated ring that might survive months on a 6mm helix hoop can fail much faster on a 12mm conch hoop simply because there is more surface area under stress.
Beyond biocompatibility, gold’s visual impact in a conch hoop is unmatched. The hoop wraps around the entire ear, catching light along its full circumference. A 14K gold seamless conch hoop creates a warm, glowing frame that plated or titanium alternatives cannot replicate at this size.
Choosing your gauge and diameter
Gauge
| Gauge | Thickness | Conch use | Notes |
|---|---|---|---|
| 16G Standard | 1.2mm | Most conch piercings | Provides structural rigidity for the large hoop diameter |
| 18G | 1.0mm | Some conch piercings, thinner profile | Lighter wire — a more delicate look but less structural support at large diameters |
Diameter — conch hoops run larger than every other ear piercing
This is the detail that catches people off guard. A conch hoop must travel from the inner bowl, across the antihelix, over the helix rim, and connect behind the ear. That is a much longer distance than any helix, daith, or tragus hoop covers. The exact diameter depends on your individual ear anatomy and where the piercing sits within the conch bowl.
A 12mm 14K gold conch hoop fits most standard inner conch placements. If your ear is smaller, 10mm or 11mm may work. If your ear is larger or the piercing sits deeper in the bowl, you may need 13mm, 14mm, or even 15mm for the hoop to clear the rim without pressure.
How to measure your conch hoop diameter
Paper strip method: Thread a narrow strip of paper through the piercing hole and bring it up and over the helix rim to where the bottom of the hoop would rest on the outer ear. Measure — this is your minimum inner diameter. Add 1–2mm for comfortable clearance.
Piercer measurement: Given the complexity of conch hoop sizing, we strongly recommend having your piercer measure your ear. They can trial different diameters to find the size that wraps smoothly without pressure.
Styling your 14K gold conch hoop — the anchor piece
In ear-stacking terminology, the conch hoop is your “anchor” — the largest, most visually dominant piece. Build the rest of your stack around it.
Conch hoop as the anchor
Pair a luxury 14K gold conch ring with smaller helix huggers (6–8mm), a dainty tragus stud, or a flat-back lobe piece. The conch hoop provides the drama; the supporting pieces add nuance. The visual hierarchy works because the conch hoop is physically the largest element, naturally drawing the eye first.
Metal consistency
Because the conch hoop is so visible, any metal mismatch with other ear jewellery becomes immediately apparent. If your conch hoop is yellow gold, ensure your helix hoops and studs are yellow gold too. Mixing metals can work as an intentional choice, but for a cohesive stack, colour consistency is key.
Preventing snags
The conch hoop wraps outside the ear, which means hair, scarves, and jumpers are constant threats. Tie long hair back on the pierced side. When pulling clothing over your head, cup your hand over the ear. A well-fitted hoop that sits snugly against the ear is less likely to catch than an oversized one that protrudes.
Caring for your conch piercing and hoop
- Spray sterile saline onto the piercing once or twice daily
- Let warm shower water rinse the area — the ear bowl collects residue
- Do not rotate or move the hoop during healing
- Be mindful when putting on jumpers, scarves, or hats — fabric catches easily on conch hoops
- Over-the-ear headphones during healing — they press the hoop inward against cartilage
- Sleeping on the pierced ear — the large hoop distorts under pillow pressure
- Hair tangling in the hoop — tie long hair back on the pierced side
- Swimming or submerging the ear until fully healed
- Touching or playing with the hoop throughout the day
Common conch hoop buying mistakes
1. Using helix hoop sizing for a conch piercing
An 8mm hoop works for a helix but is far too small for a conch. The conch hoop must traverse from the inner bowl up and over the helix rim — typically requiring 10–15mm. Ordering helix-sized hoops for a conch is a waste of money.
2. Switching to a hoop before healing is complete
Conch piercings take 6–12 months to heal. A large hoop moves significantly with head movement, hair contact, and clothing. This constant movement disrupts healing cartilage. Heal with a flat-back stud first.
3. Ignoring the cheese-cutter effect
A too-small or too-tight conch hoop presses against the helix rim and slowly migrates through the cartilage. This is gradual but irreversible. Always ensure the hoop clears the rim with zero sustained pressure.
4. Choosing plated metal for a large hoop
A conch hoop has more surface area in contact with skin than any other ear jewellery. More surface area means more potential for coating breakdown. The investment in a luxury 14K gold conch ring is more justified here than in any other ear position.