Key takeaways
- Conch bumps are irritation bumps (granulation tissue) — not infections and not keloids in the vast majority of cases
- The conch is especially bump-prone because it sits in the thickest ear cartilage, heals the slowest (6–12 months), and faces constant pressure from sleeping and over-ear headphones
- The #1 cause for conch bumps: sleeping on the pierced ear. #2: over-ear headphones pressing on the jewellery
- Treatment is simple: remove the irritation source, switch to safe metal, use sterile saline only — 2–4 weeks to resolve
- A conch hoop that is the wrong diameter creates persistent pressure bumps — sizing is uniquely important for the conch
- 14K solid gold or implant-grade titanium eliminates material-related bumps permanently
What a conch bump actually is
The bump beside your conch piercing is almost certainly a granuloma — a mound of excess healing tissue that forms when the piercing is repeatedly irritated. Your body is trying to heal the wound, but something keeps disrupting the process. Each disruption triggers a fresh healing response, and over time these responses accumulate into a visible bump.
This is not an infection. An infection involves bacteria, produces thick coloured pus, causes spreading redness and escalating pain, and may be accompanied by fever. A granuloma is an irritation response — the tissue is reacting to pressure, friction, or a chemical irritant (like nickel), not to bacteria.
It is also almost certainly not a keloid. True keloids are genetic, grow beyond the wound boundaries, and do not resolve on their own. An irritation bump stays at or near the piercing hole, appeared after a specific trigger, and will flatten once the cause is removed.
Why the conch is especially vulnerable
The conch is one of the most bump-prone piercing locations on the ear. This is not because the piercing is inherently problematic — it is because of the unique anatomy and daily pressures the conch faces:
Thickest ear cartilage. The conch bowl is the densest cartilage on the ear. Dense cartilage has limited blood supply, which means slower nutrient delivery to healing tissue, slower waste removal, and a longer healing window (6–12 months). Every additional month of healing is another month of vulnerability to irritation.
Over-ear headphones. Unlike the tragus (which conflicts with earbuds), the conch conflicts with over-ear headphones. The padded cups of over-ear headphones press directly onto the conch bowl, compressing the jewellery into the wound channel. This is the conch-specific pressure source that tragus and helix piercings do not face. See our conch and headphones guide for solutions.
Sleeping surface area. When you sleep on the pierced side, the entire weight of your head compresses the conch jewellery into the ear bowl. Because the conch sits in the centre of the ear, there is no angle at which side-sleeping avoids pressure — unlike the helix, where positioning can reduce contact.
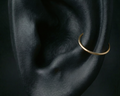
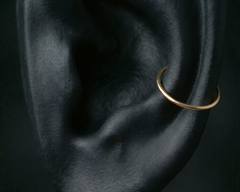
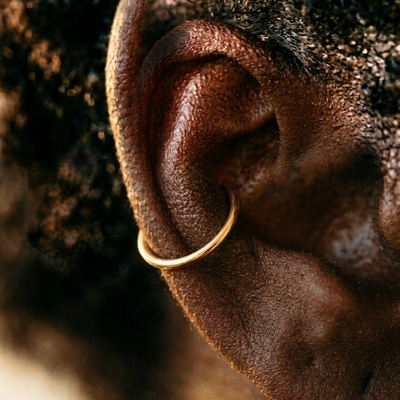
Hoop mechanics. A conch hoop does not simply sit in the piercing — it travels through the conch bowl and wraps around the outer helix rim. This long path creates multiple friction points: the piercing channel, the exit at the back of the ear, and the curve over the helix. A hoop that is even slightly wrong in diameter creates persistent leverage on the piercing. See our conch size guide for correct sizing.
Hair and products. The conch sits in a concave bowl that naturally traps hair, hair products, shampoo residue and sweat. These substances migrate into the piercing channel, adding chemical irritation.
The causes, ranked
#1 Most common
Sleeping on it
Side sleepers compress the conch jewellery all night. The ear bowl offers no escape angle — the entire conch takes pressure. This alone causes more conch bumps than all other factors combined. A travel pillow is the single most effective prevention tool.
#2 Very common
Over-ear headphones
Padded cups press onto the conch bowl, pushing the jewellery into the wound. Even short sessions during healing can trigger a bump. Switch to earbuds (AirPods work perfectly with conch piercings) or bone conduction headphones during healing.
#3 Common
Wrong material
Nickel in surgical steel or corroding base metal under gold plating. The conch’s thick cartilage amplifies inflammatory reactions — nickel that causes a mild response on a lobe creates an aggressive bump on the conch. Material bumps persist until the metal is changed.
#4 Common
Wrong hoop size
A conch hoop that is too small presses into the ear rim; too large and it catches on everything. Either creates chronic friction. The conch is the piercing where hoop sizing matters most because the ring travels a long path from the bowl to the helix edge.
#5 Occasional
Switching to hoop too early
The conch needs 6–12 months in a flat-back stud. Switching to a hoop before full maturity introduces rotation, leverage and friction into a channel that is not ready. This is the number one cause of bumps that appear months after the piercing seemed healed.
#6 Occasional
Hair and product buildup
The concave ear bowl traps hair spray, conditioner, dry shampoo and sweat around the piercing. These products irritate the healing tissue chemically. Rinse the conch area thoroughly in the shower and keep hair products away during healing.
Inner vs outer conch bumps
Inner conch piercings (in the deepest part of the bowl) are more prone to sleeping-related bumps because the jewellery sits in the most recessed area of the ear. Outer conch piercings (higher up, near the flat of the ear) are more exposed to headphone and hair contact. Both are equally affected by material quality. Know your conch placement when diagnosing the cause of your bump.
How to treat it
Identify your cause
Review the cause grid above. The conch’s biggest culprits are sleeping and headphones. If you are a side sleeper on the pierced ear, or if you wear over-ear headphones regularly, you have your answer. If neither applies, check your material next.
Eliminate the pressure
Sleeping → use a travel/donut pillow with the ear in the hole, or sleep on the other side. Headphones → switch to earbuds (AirPods sit inside the ear canal, away from the conch) or bone conduction headphones. See our
conch headphone guide for specific recommendations.
Check your material
Surgical steel, gold-plated, sterling silver, or unknown alloy → visit your piercer to swap for implant-grade titanium (ASTM F-136) or 14K solid gold (nickel-free alloy). Do not change jewellery yourself if the bump is actively inflamed.
Verify your hoop size (if wearing a hoop)
A conch hoop must be the correct diameter for your ear anatomy. Too tight = presses into the helix rim, causes constant leverage on the piercing. Too loose = catches on hair, clothing and pillowcases. If you suspect sizing, visit your piercer or see our
conch hoop size guide. Consider switching back to a flat-back stud temporarily while the bump resolves.
Saline only, twice a day
Sterile saline spray (0.9% sodium chloride, no additives). Spray the bump and both sides of the piercing. Stop using every other product — no tea tree oil, no aspirin paste, no chamomile, no soap directly on the piercing. Saline and shower water only.
Wait 2–4 weeks
Once the cause is removed, expect 3–5 days before visible change and 2–4 weeks for full resolution. Conch bumps can be slower to resolve than tragus or helix bumps because the thick cartilage heals more slowly. Stubborn bumps may take 6–8 weeks. Patience is the treatment.
Do not switch to a hoop to “help it heal”
If you developed a bump while wearing a flat-back stud, switching to a hoop will make things worse. Hoops add rotation and leverage inside the channel. If you developed a bump while wearing a hoop, consider switching back to a flat-back stud until the bump is fully resolved and the piercing channel has restabilised. A stud creates zero movement — exactly what irritated cartilage needs.
Nickel-free · safe
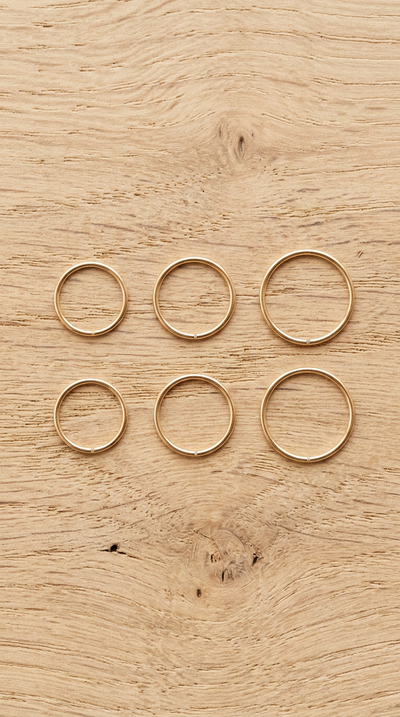
14K Gold Conch Ring
14K solid gold, nickel-free alloy. Eliminates material bumps. 16G & 18G, 8-12mm.
Shop bump-free rings ->Recovery timeline
Day 1–5
No visible change
The bump looks the same. Conch cartilage is thick and slow to respond. Internal healing has begun but is not yet visible. If you swapped jewellery, expect mild tenderness as the tissue adjusts.
Day 5–10
First signs
Tenderness decreases. The bump may feel softer or look slightly flatter. Redness begins to fade. The conch responds more slowly than the tragus or helix — do not compare timelines across piercings.
Week 2–3
Visible reduction
The bump is noticeably smaller. Day-to-day fluctuation is normal — it may look better one morning and slightly puffier the next (often related to sleeping position). The overall trend should be downward.
Week 3–6
Mostly resolved
Most conch bumps are flat or nearly flat. A slight textural change or discolouration may remain at the site for an additional few weeks. Continue saline, continue sleeping away from the pierced side.
Week 6–10
Stubborn bumps
If the bump persists, revisit causes. Conch bumps can be more stubborn than other cartilage bumps because of the thick tissue. Common hidden triggers: unconsciously sleeping on the pierced side, over-ear headphone use you forgot counts, or a hoop diameter that is slightly off. See your piercer for an in-person assessment.
Why material is critical for conch
The conch sits in the thickest, densest cartilage on the ear. This means the healing channel is longer, the tissue contact area is greater, and the exposure time to any irritant is extended. What might cause a mild reaction on a lobe or nostril can cause an aggressive, persistent bump on the conch.
Nickel triggers an immune response that is amplified by the conch’s slow healing. The body builds granulation tissue to isolate the irritant, but because the conch heals so slowly, the inflammatory cycle perpetuates itself for weeks or months as long as the nickel source remains.
| Material | Nickel | Conch bump risk |
|---|
| 14K solid gold SAFEST | None (nickel-free alloy) | Near zero |
| Implant-grade titanium | None (ASTM F-136) | Near zero |
| “Surgical steel” | 10–14% | High — dense cartilage amplifies reaction |
| Gold-plated | In base metal | High — plating degrades inside long channel |
| Sterling silver | Trace + oxidises | Moderate — oxidation products irritate thick tissue |
Switching to 14K solid gold or titanium typically shows improvement within 5–7 days for conch piercings (slightly slower than tragus or nostril due to thicker cartilage). For the full material comparison, see our gold-plated vs solid gold guide.
The conch hoop sizing factor
The conch is the one piercing where hoop sizing directly causes bumps even when everything else is right. Here is why:
A conch hoop travels a long path: through the piercing channel in the ear bowl, out the back of the ear, and around the outer helix rim. This path is typically 10–14mm depending on your ear anatomy. A hoop that is even 1–2mm too small creates constant inward pressure on the helix rim, which pulls on the piercing hole and triggers a bump at the entry or exit point.
A hoop that is too large does the opposite: it catches on hair, clothing and pillowcases, creating outward tugging that irritates the channel. The sweet spot is a hoop that wraps the helix rim with gentle contact — not pressing in, not pulling away.
Most common conch hoop sizes: 10mm is the most popular for standard ear anatomy. 8–9mm for smaller ears or closer placement. 12mm for larger ears. See our conch hoop size guide for measuring instructions.
Hoop bump vs material bump
A sizing-related bump typically appears at the entry or exit point of the hoop — where the ring puts the most leverage on the tissue. A material-related bump can appear anywhere around the piercing hole and is usually accompanied by itching or a warm sensation. If the bump is precisely at the point where the hoop enters or exits the ear, sizing is the likely cause. If it surrounds the piercing hole evenly, material is more likely.
How to prevent conch bumps
Sleep management is everything. Use a travel pillow, a donut pillow, or consciously sleep on the other side. The conch is the most sleep-sensitive piercing on the ear because of its central, recessed position. Solving sleep pressure prevents the majority of conch bumps before they start.
Switch headphone type during healing. Over-ear headphones are the enemy of conch piercings. Earbuds (AirPods, etc.) sit inside the ear canal and do not contact the conch at all — they are perfectly safe. If you must use over-ear headphones, limit sessions to under 30 minutes and ensure the cups are not pressing on the conch. See our headphone guide.
Start with safe material. Implant-grade titanium or 14K solid gold from day one. Do not experiment with cheap metal on the conch — thick cartilage punishes material mistakes more severely than any other piercing.
Wait longer before switching to a hoop. The conch takes 6–12 months to mature. Many piercers recommend waiting a full 12 months before introducing a hoop. The longer you wait, the more robust the channel, and the lower the risk of a post-switch bump. When you do switch, see our conch hoop insertion guide.
Rinse hair products away from the conch. After applying hair spray, dry shampoo, conditioner or styling products, tilt the pierced ear under running water for a few seconds. The concave ear bowl traps residue that other piercings naturally shed.
When to see a professional
Bump not improving after 6 weeks of consistent treatment. Conch bumps can be slow, but 6 weeks should show meaningful progress. Your piercer can check sizing, material and placement in person.
Bump growing beyond the piercing site. A bump that extends beyond the piercing hole, is hard and shiny, and does not respond to cause removal may be a keloid. See a dermatologist for assessment and treatment options.
Infection signs — see a doctor
Thick green or white pus, spreading redness across the ear, escalating throbbing pain, noticeable warmth, swelling of the outer ear, or fever. These indicate infection, not irritation. Do not remove the jewellery (it can trap infection inside). See your GP or a walk-in clinic. For detailed infection guidance, see our conch healing articles.
Frequently asked questions
Can I still wear over-ear headphones with a conch bump?
Not until the bump has fully resolved. Over-ear headphones press on the conch and are likely contributing to the bump. Switch to earbuds (AirPods, etc.) which sit inside the ear canal and do not contact the conch at all. Resume over-ear headphones only after the bump has been flat for at least 2 weeks.
My bump appeared after switching to a hoop — why?
Two likely reasons: the hoop introduced rotation and leverage that the stud did not create, or the hoop diameter is wrong for your ear anatomy. A too-small hoop presses into the helix rim; a too-large one catches and tugs. Consider switching back to a flat-back stud until the bump resolves, then try a different hoop diameter. Your piercer can measure for the correct size.
Why does my conch bump keep coming back?
The cause has not been fully eliminated. The most common pattern: the bump shrinks when you are careful, then returns when you unconsciously sleep on the pierced side or resume over-ear headphone use. Track your sleeping position and headphone habits for a week. If you are certain neither is the issue, the material or hoop sizing is suspect. Visit your piercer for an in-person assessment.
Is a conch bump harder to treat than a tragus bump?
It can take longer. The conch cartilage is thicker than the tragus, which means the healing tissue responds more slowly to improvements. While a tragus bump may show visible change within 3–5 days, a conch bump may take 5–10 days to begin shrinking. Full resolution also takes longer — 3–6 weeks for conch versus 2–4 for tragus. The treatment protocol is identical; the timeline is simply stretched.
Should I downsize my conch hoop?
If your current hoop catches on things, feels loose, or creates a noticeable gap between the ring and the helix rim, a smaller diameter may fit better. If the ring presses into the helix rim and creates a visible indentation, you need a larger diameter, not smaller. The correct hoop should rest gently against the outer ear rim without pressing in or pulling away. See our
conch size guide for help.
Will tea tree oil fix my conch bump?
No. Tea tree oil is a chemical irritant on wound tissue. It causes contact dermatitis and allergic reactions on the conch just as it does on any other piercing. Professional piercers and dermatologists consistently advise against it. The conch’s thick cartilage is particularly unforgiving — adding a chemical irritant to an already-irritated piercing creates a compounding problem that takes significantly longer to resolve. Use sterile saline only.
←
Conch Piercing Healing: Your Complete Timeline
Week-by-week healing, aftercare, and when to switch to a hoop
S
Stepoy
Piercing Jewellery Specialists
We craft handmade 14K solid gold piercing jewellery and publish in-depth guides to help you make informed decisions about your piercings.