Key takeaways
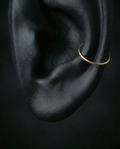
- The conch hoop follows a unique path: through the inner ear cartilage, around the outer helix rim, and back — no other ear hoop does this
- Insert from the back of the ear (behind the conch), pushing the wire forward through the piercing and out the front
- Once the wire exits the front, guide the ring downward and around the helix rim, following the ear’s natural curve
- Only attempt this after full healing — 6 months minimum, 9 months ideal for conch piercings
- Have your piercer do the first conch hoop insertion — they can confirm size and technique on your anatomy
- Ring-opening pliers are highly recommended — 10–12mm rings in 16G require more force to open and close than small ear hoops
Why conch hoops are different
Inserting a conch hoop is not the same as inserting a helix, tragus or nose hoop. Those piercings are near the edge of the tissue, and the ring wraps a short distance around a thin piece of cartilage or skin. The conch is in the centre of the ear. The ring must travel from the flat inner bowl of the ear, through the piercing, around the entire outer rim (the helix edge), and back to meet itself.
This longer path means you need to guide the ring through a wider arc. The ring is larger (10–12mm versus 6–8mm for helix), which makes it physically bigger to handle. And the helix rim acts as a barrier that the ring must curve around smoothly — if the ring catches on the rim, it can be uncomfortable or frustrating.
The good news: once you understand the path the ring needs to travel, the process is logical and straightforward. It takes more patience than a helix hoop, but the mechanics are the same — twist open, thread through, guide around, close.
First time? See your piercer
We recommend having your piercer perform the first conch hoop insertion. They can confirm that the piercing is fully healed (6–9 months for conch), verify the diameter is correct for your ear anatomy, and show you the specific path and angle for your piercing. Once you have seen it done on your ear, doing it yourself next time is significantly easier.
Before you start
Confirm healing. Conch piercings take 6–12 months to fully mature. The flat cartilage has limited blood supply and heals slowly. Do not attempt a hoop insertion until you have had the piercing for at least 6 months with zero tenderness, zero discharge, and zero crusting. Ideally, wait until month 9. See our conch healing guide for the full timeline.
Confirm your size. Conch hoops are typically 10–12mm in 16G or 18G. If you have not yet determined your size, see our conch hoop size guide. Using the wrong diameter will make insertion difficult or impossible — too small and the ring will not reach around the helix rim, too large and it will hang loosely.
What you need
Clean hands — wash thoroughly.
Saline spray — for cleaning the piercing and the ring.
A well-lit mirror — the conch is visible in a standard bathroom mirror, unlike the tragus. Good lighting is still important for seeing the helix rim clearly.
Your seamless ring — rinsed with saline, dried with a paper towel.
Ring-opening pliers — strongly recommended. A 10–12mm ring in 16G is a larger, thicker piece of wire than a nose or tragus hoop. Opening and closing it with fingers alone is possible but significantly harder. Flat-jaw pliers designed for body jewellery make the job clean and precise.
Removing the stud
Locate the flat back
Reach behind your ear and feel for the flat disc of the labret stud on the back of the conch. The conch is easier to access than the tragus — the back of the ear is open and your fingers can reach the disc directly.
Hold the back, unscrew the front
Grip the flat disc between your thumb and fingertip behind the ear. With your other hand, grip the decorative front on the inner ear side and twist counterclockwise. For push-pin (threadless) styles, hold the back and pull the front straight outward.
Slide the post out
Pull the post through from behind the ear. If it resists, spray saline on both sides and try again. The channel should be well-established after 6+ months — the post should slide smoothly.
Insert the hoop promptly
Cartilage piercings can begin to tighten within hours without jewellery in place. Once the stud is out, proceed directly to the hoop insertion. If you need to pause, slide the stud back in rather than leaving the piercing empty.
Opening the ring
Conch hoops are larger and thicker than nose or tragus rings, which changes the opening experience:
Grip both sides near the join
Hold the ring with your thumb and index finger on each hand, positioned on either side of the join. If using pliers, grip one side with the pliers and hold the other side with your fingers.
Twist apart — not pull
Push one end toward you and the other away. The ends separate vertically while the ring stays circular. A 16G ring requires noticeably more force than a 20G nose ring — this is normal. Use firm, controlled pressure. You need a gap of about 3mm — enough for the wire to enter the piercing channel.
Check the gap
The ring should still look circular with a small vertical offset at the join. If it looks oval, you pulled instead of twisted. Gently reshape it and try again.
Pliers make a real difference here
A 10mm ring in 16G 14K gold has genuine resistance when you try to open it with fingers. The wire is thick enough and the diameter large enough that your grip can slip. Flat-jaw ring-opening pliers give you precise, non-slip leverage. They are inexpensive and will be useful for every conch hoop change going forward. Worth the small investment.
Step-by-step insertion
Clean everything
Wash hands, spray saline on the piercing and ring, pat the ring dry with a paper towel.
Find the hole from behind the ear
Reach behind your ear with one hand. Feel the back surface of the conch area for the piercing hole. It will be a small dimple in the cartilage. The conch hole is easier to find than a tragus hole because the back of the ear is an open, accessible surface.
Insert from behind, pushing forward
Take the open ring and guide one end into the hole from behind the ear, pushing forward through to the inner ear. Your fingertip behind the ear directs the wire into the channel. Push gently until the wire tip emerges on the front surface (the concha bowl side).
Guide downward toward the helix rim
Once the wire exits the front, continue feeding the ring through by rotating it downward. The ring should begin to curve toward the bottom of the ear. Continue rotating until the ring reaches the outer helix rim — the edge of the ear.
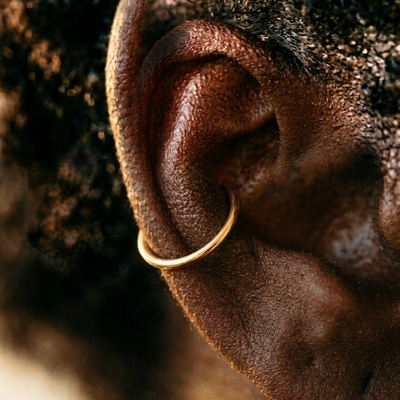
Wrap around the helix rim
This is the step unique to the conch. The ring needs to curve around the helix edge. Gently guide the ring so it hooks over the rim and begins to travel behind the ear. The ring should sit against the helix rim, with the wire following the ear’s natural contour. This may require gentle finger pressure to ease the ring over the rim without catching.
Close the ring
Once the ring is fully seated around the helix rim, bring the two ends back together. Reverse the twisting motion used to open: push the ends toward each other until the gap closes completely. Use pliers if needed. Run your fingertip over the join — it should feel smooth with no catch or step.
Check the position
Look in the mirror. The ring should form a clean arc from the conch, down and around the helix rim. The join should be hidden behind the ear. The ring should not pinch the helix rim or pull the conch piercing outward. If it does, the diameter may be too small — see our
size guide.
The helix rim is the tricky part
The moment the ring needs to curve over and around the helix rim is where most people get stuck. The rim is a ridge of cartilage, and the ring needs to hook over it smoothly. If the ring catches or feels stuck at this point, try gently folding the top of the ear forward with one hand to widen the gap between the rim and the ring. This gives the ring the space it needs to slide over. Do not force it — if the ring physically cannot reach around the rim, it is too small.
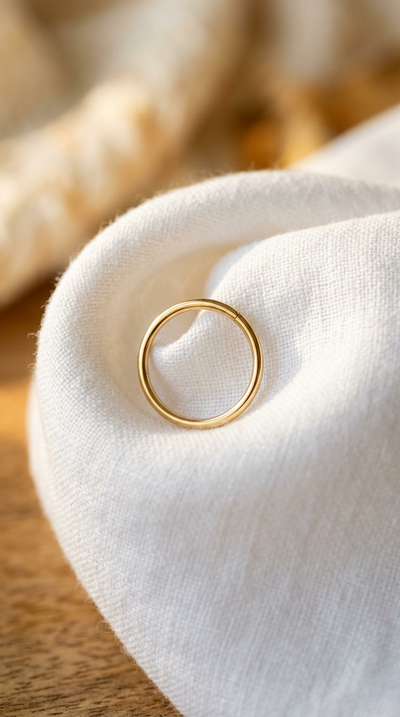
Seamless hoop
14K Gold Conch Ring
Handmade seamless hoop. 8-12mm in 16G & 18G. Nickel-free 14K solid gold.
Shop conch rings ->Troubleshooting problems
The ring will not reach around the helix
The ring is too small. A 10mm ring that perfectly fits one person may be too tight for another because ear anatomy varies. Size up by 1–2mm. If you are using 10mm, try 12mm. The ring must have enough diameter to comfortably wrap the full distance from conch to helix rim and back without pulling or pressing.
The ring catches on the helix rim
The helix edge is a ridge, and the ring needs to glide over it. Try folding the ear top gently forward with one hand while guiding the ring with the other. This creates space for the ring to clear the rim. If the ring is the correct diameter but still catches, the join area may have a small bump or misalignment — check that the ends are smoothly aligned before inserting.
The ring sits unevenly
An uneven ring usually means the diameter is slightly too small, causing the ring to tilt rather than sit flat against the ear. It can also happen if the ring is not fully seated — gently rotate it until the join sits behind the ear and the ring hangs symmetrically. If tilting persists, try the next size up.
I cannot close the ring
A 10–12mm ring in 16G has significant spring tension. Closing it by hand is hard. Ring-opening pliers are the answer — grip both sides and twist the ends back together with controlled, even pressure. If you cannot get the ends flush, your piercer can close it for you in a quick visit.
Pain during insertion
Mild resistance is expected as the wire passes through thick cartilage. Sharp pain means something is wrong: the piercing may not be fully healed, the gauge may be incorrect, or you are not aligned with the channel. Stop, spray saline, and either retry at a different angle or insert the stud back in and visit your piercer.
After insertion
Saline twice daily for 5–7 days. The conch is thick cartilage, and a jewellery change is more disruptive here than on soft tissue piercings. Give it a week of gentle aftercare.
Do not sleep on it. Sleeping pressure is the number one enemy of conch piercings at every stage — healing and healed. The hoop wraps the helix rim, and pillow pressure pushes the ring into the rim, causing soreness and potential bumps. Use a travel pillow with a hole or sleep on the opposite side. This is not temporary advice — it applies permanently when wearing a conch hoop.
Avoid over-ear headphones for the first week. Over-ear headphone padding rests on the helix rim, exactly where the hoop sits. Give the piercing a week to settle with the new jewellery before adding headphone pressure.
Watch for bumps. A small irritation bump in the first 1–2 weeks after switching is possible, especially on the conch. Continue saline care. If the bump grows or persists beyond 3 weeks, the ring may be too small (pressing on the rim), the piercing may not have been ready, or sleeping pressure is the culprit.
Frequently asked questions
Can I insert a conch hoop by myself?
Yes, once you know the technique and have the right tools. The conch is more accessible than the tragus because you can see it in a mirror and reach behind the ear easily. Ring-opening pliers are strongly recommended for 16G rings. Most people manage it solo after seeing it done once by their piercer.
Which direction do I insert?
From behind the ear, pushing forward through the conch to the inner ear bowl. Feel for the hole behind the ear with your fingertip, guide the wire into the channel, and push until it exits on the front surface. Then rotate the ring downward and around the helix rim.
How long does it take?
First attempt: 15–20 minutes (the helix rim step takes practice). With experience: 3–5 minutes. The conch hoop takes longer than smaller ear hoops because the ring is larger and the helix rim adds a step that other piercings do not have.
Do I need ring-opening pliers?
Technically no, but practically yes. A 10–12mm ring in 16G has real resistance when opening and closing. Fingers can do it, but pliers do it better, faster, and with less risk of warping the ring. They cost under £10 and are worth owning for the conch specifically.
Can I switch back to a stud after wearing a hoop?
Yes, at any time. Remove the hoop (twist open, guide out) and insert the stud. Many people keep a flat-back stud for daily over-ear headphone use and switch to the gold hoop for evenings and social occasions.
The ring keeps pressing into my helix when I sleep — what should I do?
Sleep on the opposite side or use a travel pillow with a hole (the ear sits in the hole, taking all pressure off the helix rim). This is the single most important lifestyle adjustment for conch hoop wearers. Some people also switch to a stud at bedtime and put the hoop back in the morning, though this is more effort than most people want.
←
Conch Hoop Size Guide: 8mm-12mm
Compare sizes and find your perfect conch hoop
Ready to wrap your ear in gold?
14K solid gold conch hoops. 8-12mm. Handmade, nickel-free.
Shop conch rings ->S
Stepoy
Piercing Jewellery Specialists
We craft handmade 14K solid gold piercing jewellery and publish in-depth guides to help you make informed decisions about your piercings.