How to Stack Lobe Piercings: Hoop Styling Guide

- A curated lobe stack looks intentional because of three things: one metal colour, graduated sizes, and mixed styles
- Five classic configurations cover almost every lobe stack — all studs, all hoops, graduated hoops, stud-hoop mix, and asymmetric ears
- The lobe is the anchor of the entire ear — build the lobe stack first, then add upper ear piercings around it
- Match metal across the full ear, not just within the lobe — a yellow gold lobe with a silver helix breaks the composition
- Heal every piercing on simple flat-back studs. Assemble the final stack only after all holes are confirmed healed.
- Asymmetric stacking (different configurations on each ear) is the dominant trend — matching ears is no longer the default
What makes a lobe stack look intentional
The difference between a curated lobe stack and "I have three piercings" comes down to three design decisions made before any jewellery is purchased.
One metal colour. All pieces in the same gold tone — yellow, white or rose. Mixing metals across a lobe stack is the single fastest way to make it look unplanned. Three 14K yellow gold pieces in different styles look curated. Two gold and one silver look like you ran out of matching jewellery.
Graduated sizes. Largest earring at the bottom (first lobe), smallest at the top (third lobe). This follows the natural taper of the earlobe and creates a visual cascade. Equal sizes across all three positions look uniform but static. Top-heavy arrangements (biggest at the top) look off-balance.
Mixed styles within one metal. A stud, a huggie hoop and a flat-back disc in the same gold create variety with cohesion. Three identical studs are monotonous. Three completely different aesthetics are chaotic. The sweet spot is variation within a family.
The five classic stack configurations
1. All studs — the clean grid
Three studs in a vertical line. Largest at the bottom (6–8mm gemstone or disc), medium in the middle (4–5mm), smallest at the top (2–3mm ball or flat-back). This is the most minimal and professional-looking stack. It works in every setting — office, evening, gym. The studs sit flat against the lobe and never catch on anything.
Best for: People who want a styled ear without any dangling or moving parts. Works well with fine features and smaller ears.
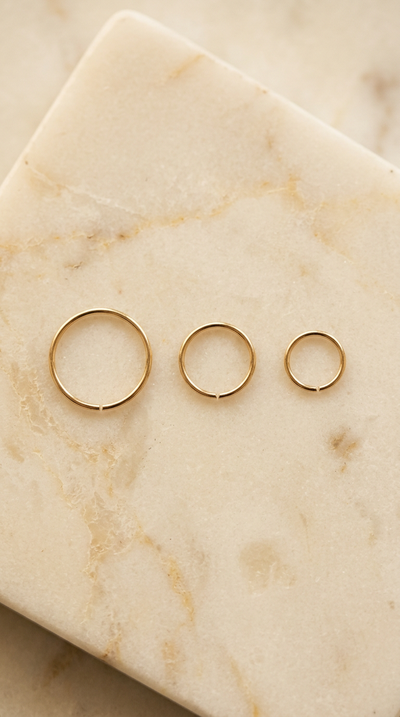
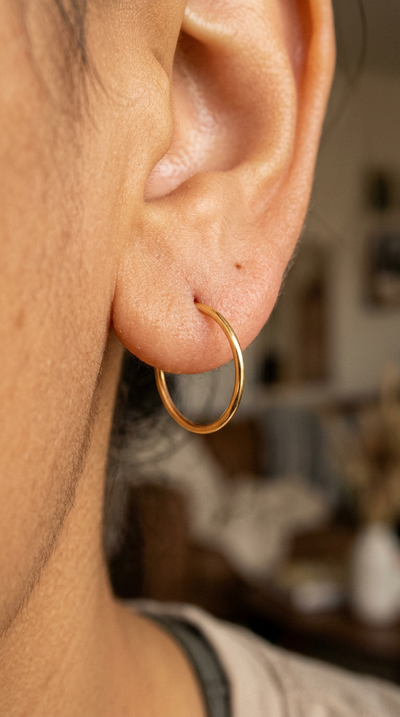
2. All hoops — the cascade
Three hoops running up the lobe, graduated in size: 8mm at the bottom, 7mm in the middle, 6mm at the top. All in the same gauge, same metal, same ring style. This creates a cascading effect that draws the eye upward along the ear. It is the most visually dynamic lobe stack and the one people are usually picturing when they search for lobe stacking inspiration.
Best for: People who want a visible, jewellery-forward look. Requires well-spaced piercings (8–10mm between holes) so the hoops do not overlap. See our lobe hoop size guide for detailed sizing.
3. Hoop + studs — the anchor
A huggie hoop or seamless ring in the first lobe, with studs in the second and third. The hoop is the statement piece, the studs are supporting accents. This is the most popular lobe stack configuration because it balances visual interest (the hoop moves and catches light) with practicality (the studs do not catch or snag).
Best for: Daily wear. The hoop gives the stack personality while the studs keep it low-maintenance. Works with any spacing.
4. Stud + hoops — the inverted anchor
A statement stud or gemstone in the first lobe, with small hoops in the second and third. The bottom earring is the focal point, and the two hoops above it create a framing effect. This works particularly well when the first lobe earring is a coloured gemstone or a distinctive shape (star, heart, initial) and the hoops are plain gold.
Best for: People who want one feature earring with a cohesive backdrop. The hoops should be small (6–7mm) so they do not compete with the stud.
5. Asymmetric ears — the curated pair
Different configurations on each ear, unified by metal colour and overall density. Example: left ear has hoop + stud + stud, right ear has stud + hoop + stud. Or left ear has a triple lobe stack while the right ear has a single lobe plus a helix hoop. Asymmetric stacking is the dominant trend because it creates a more interesting overall composition when both ears are visible.
Best for: People with different piercings on each ear, or people who want a styled look without perfectly matching both sides. The key rule: match the metal and the visual weight (total amount of jewellery) across both ears, even if the configurations differ.
| Configuration | 1st lobe | 2nd lobe | 3rd lobe | Vibe |
|---|---|---|---|---|
| All studs | Large stud | Medium stud | Small stud | Minimal, professional |
| All hoops | 8mm hoop | 7mm hoop | 6mm hoop | Bold, cascading |
| Hoop + studs MOST POPULAR | Huggie hoop | Small stud | Tiny stud | Balanced, daily wear |
| Stud + hoops | Feature stud | Small hoop | Small hoop | Focal point + frame |
| Asymmetric | Different per ear, matched by metal | Curated, modern | ||
Design rules that always work
These rules apply across all five configurations. Breaking one rule can work if you know what you are doing. Breaking two usually does not.
Rule 1: One metal, one temperature. Yellow gold is warm. White gold and silver are cool. Rose gold sits between. Mixing warm and cool metals in a lobe stack creates visual noise. Pick a temperature and commit. If you already have a helix or rook in yellow gold, the lobe stack should be yellow gold too.
Rule 2: Size descends from bottom to top. The first lobe is the anchor position. It takes the largest piece. Each position above should be the same size or smaller — never larger. A 10mm hoop above a 6mm hoop is visually top-heavy.
Rule 3: Maximum two different styles per stack. A stud and a hoop is two styles — clean and readable. A stud, a hoop and a dangle is three styles on three piercings — visually crowded at this small scale. Save the third style for an upper ear piercing where it has breathing room.
Rule 4: Gauge consistency. All lobe pieces should be the same gauge (typically 20G or 18G). Mixing a chunky 16G hoop from a cartilage piercing with a delicate 20G lobe stud creates a visible thickness mismatch that looks unintentional.
Rule 5: Leave one empty. If you have three lobe piercings and feel the stack looks too busy, removing the middle earring and wearing only the first and third creates breathing room. An intentional gap is a styling choice, not a missing piece.
Extending the lobe stack into a full curated ear
The lobe stack is the foundation, but a curated ear includes upper piercings too — helix, tragus, rook, conch, forward helix. Here is how to connect the lobe stack to the rest of the ear.
Metal must match top to bottom. If your lobe stack is 14K yellow gold, every upper ear piercing should also be 14K yellow gold. This is non-negotiable. The eye travels the entire ear, and a single mismatched metal breaks the composition.
The lobe is the heaviest section. Lobes take larger, more substantial earrings because the tissue is strong and the position is low. Upper ear piercings use smaller, lighter pieces. The overall ear should feel bottom-heavy, with visual density decreasing as you move upward.
Create a "visual bridge." If you have triple lobes and a helix hoop, the gap between the third lobe and the helix can feel empty. A tiny stud in the pre-cartilage transition zone (sometimes called an "upper lobe" or "low helix") bridges the gap. The bridge piece should be smaller than both the third lobe earring and the helix hoop.
Odd numbers of piercings read better than even. Three lobes + one helix = four piercings = visually balanced but static. Three lobes + one helix + one tragus = five = more dynamic. This is not a hard rule, but odd numbers tend to create compositions that feel more complete.
Metal mixing — when it works
The "one metal" rule is the safest approach, but deliberate metal mixing can work if it follows a pattern rather than looking random.
Two-tone split: All lobes in yellow gold, all upper ear piercings in white gold. The split is clean because the two zones are visually separated. Random mixing within the same zone does not work.
Alternating within a stack: Yellow gold, rose gold, yellow gold in a triple lobe. The alternation creates a pattern the eye can follow. Random placement of the same three metals would not read as intentional.
Accent piece: All yellow gold except one white gold or platinum piece that acts as a deliberate contrast. This works when the accent is in the focal position (first lobe) and everything else is uniform. More than one accent becomes noise.
Building a stack on a budget
A full 14K gold lobe stack can cost £150–£400 depending on styles and gemstones. Here is how to build one over time without spending everything at once.
Start with the anchor. Buy the first-lobe piece first — this sets the tone for everything above it. Spend the most on this piece because it is the most visible and the one you will keep the longest.
Add the third-lobe piece next. The smallest, simplest piece in the stack. A 2–3mm gold ball or flat-back disc costs £20–£40 in 14K gold. This completes the visual endpoints of the stack.
Fill the middle last. The second-lobe earring connects the anchor to the accent. By now you can see what the stack needs — a hoop if the other two are studs, a stud if the other two are hoops, something that bridges the size and style.